How to Add a New Fitbit to Your Account
You've got yourself a Fitbit and you've been using it for awhile. Once you have the basic stuff mastered, you might want to customize your Fitbit experience by logging into your Fitbit account on your Mac.
With your account settings you can change what email address is associated with your Fitbit account, set silent alarms to help you wake up, export all of your fitness data that your Fitbit has been tracking for you and more!
There's a lot of information you can manage through your Fitbit account, so let's get started!
- How to update personal info
- How to manage notifications
- How to manage devices
- How to change privacy settings
- How to export data
- How to manage synced applications
- How to manage sharing settings
How to update personal info
Want to change the email address you use with your Fitbit account or update your password? No problem! These are just a few of the settings that can be changed on your Fitbit account.
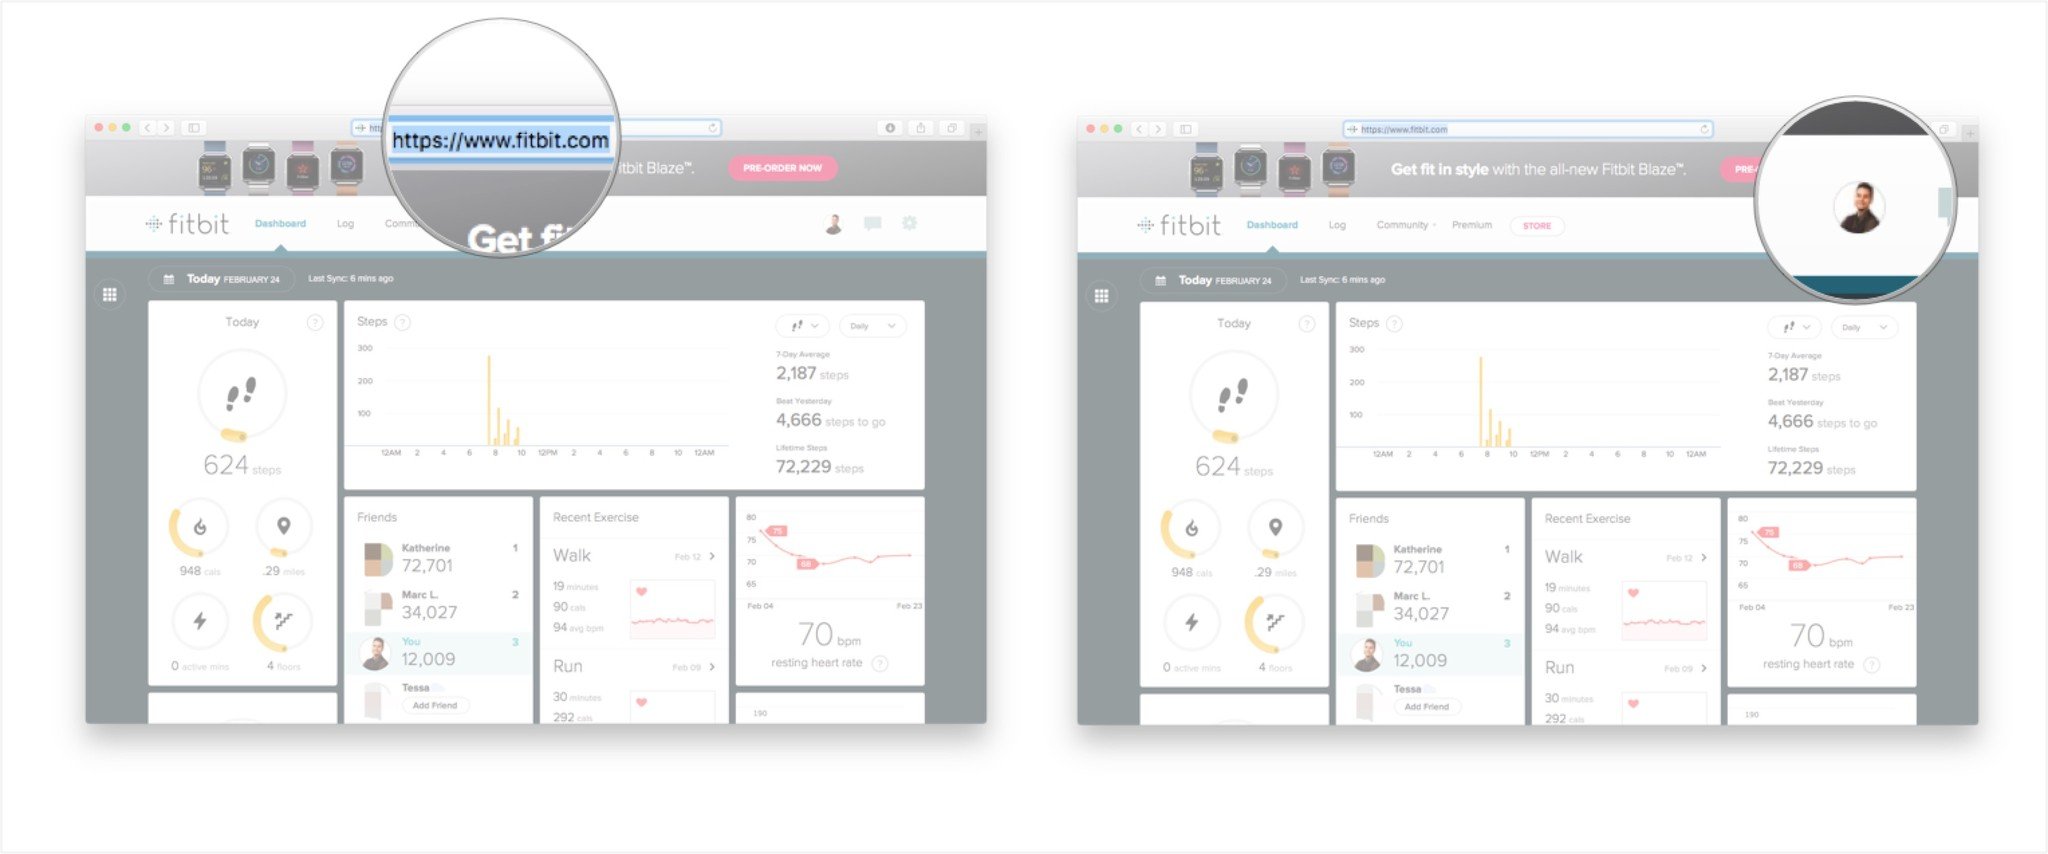
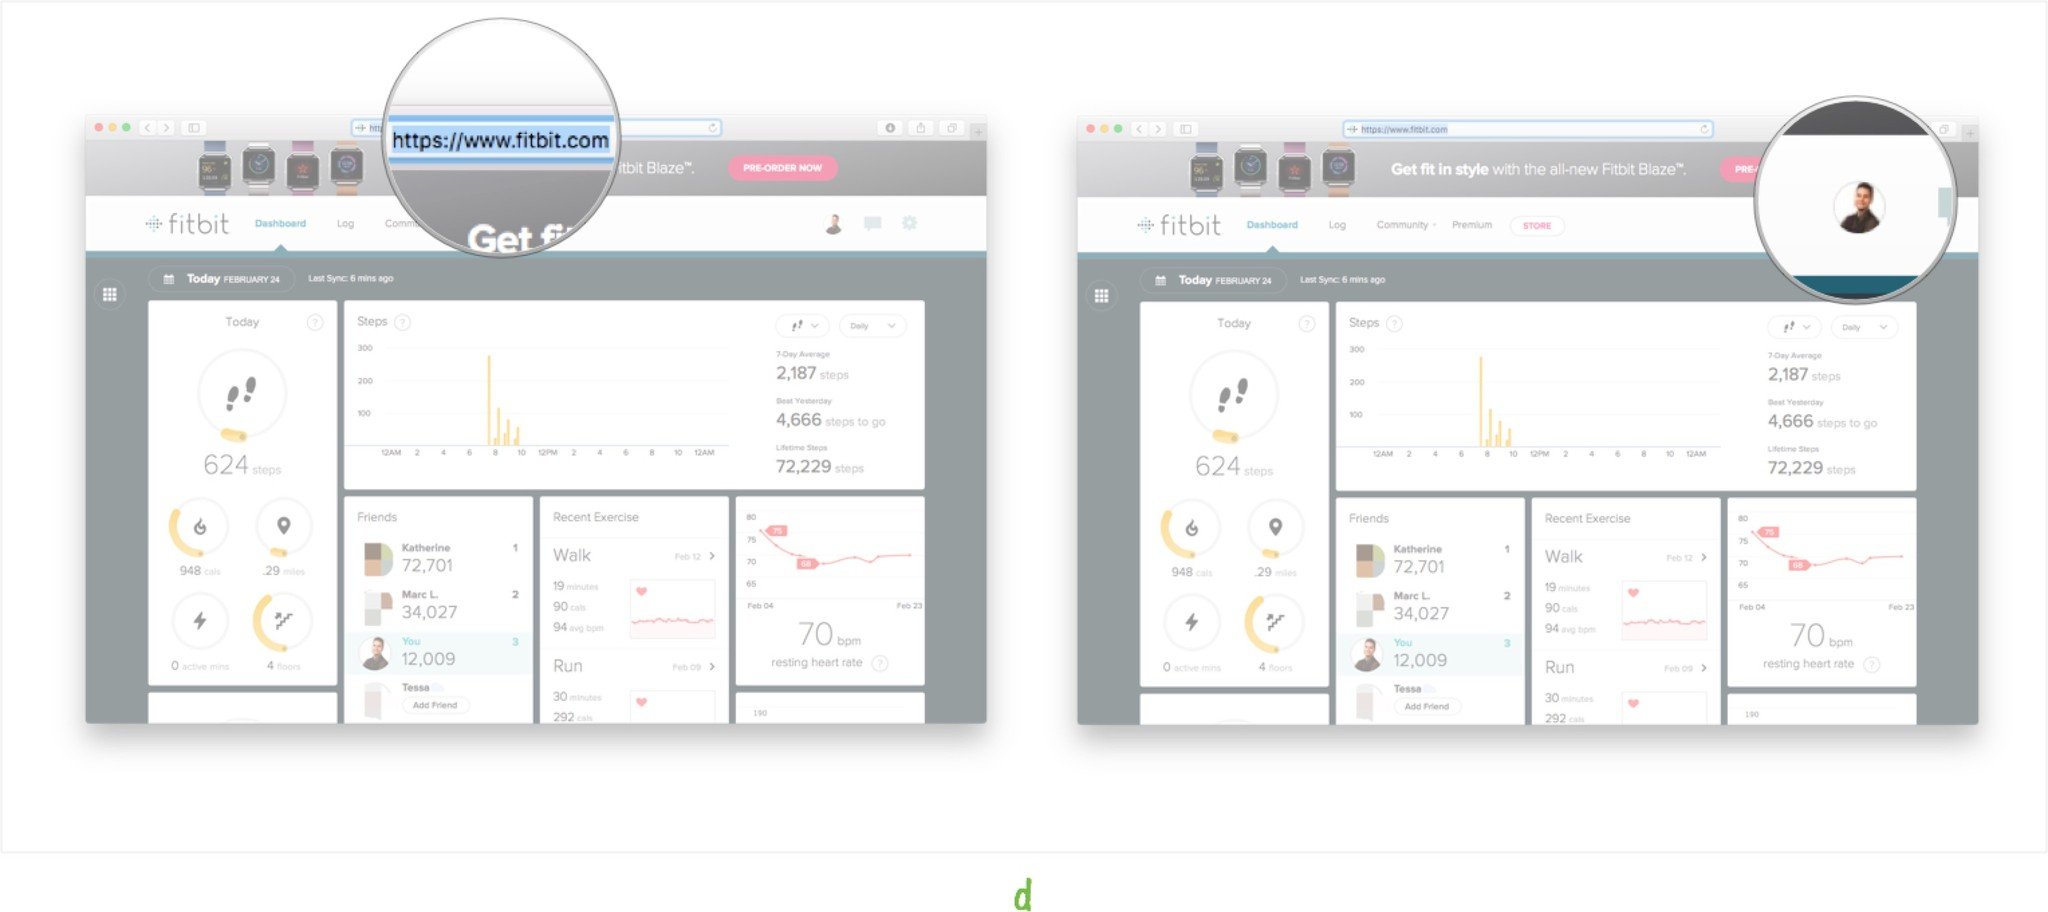
- Navigate to the online Fitbit dashboard on your Mac.
-
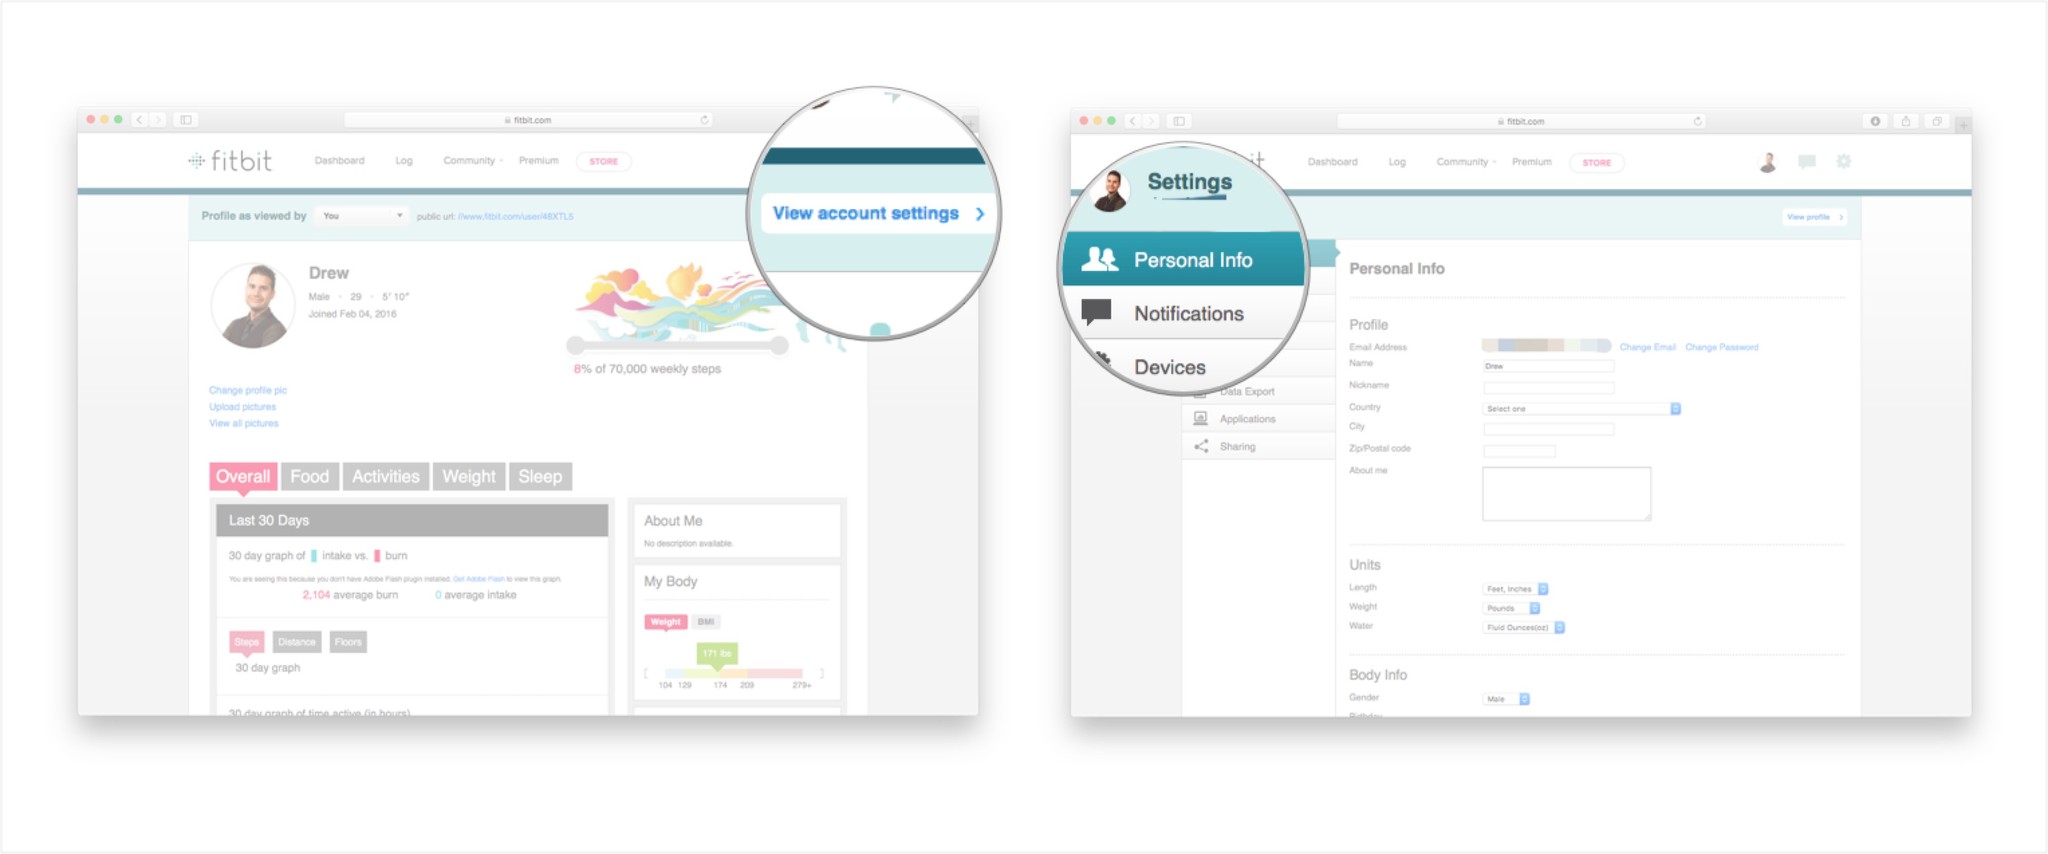
Click on your profile picture on the top right of your screen.
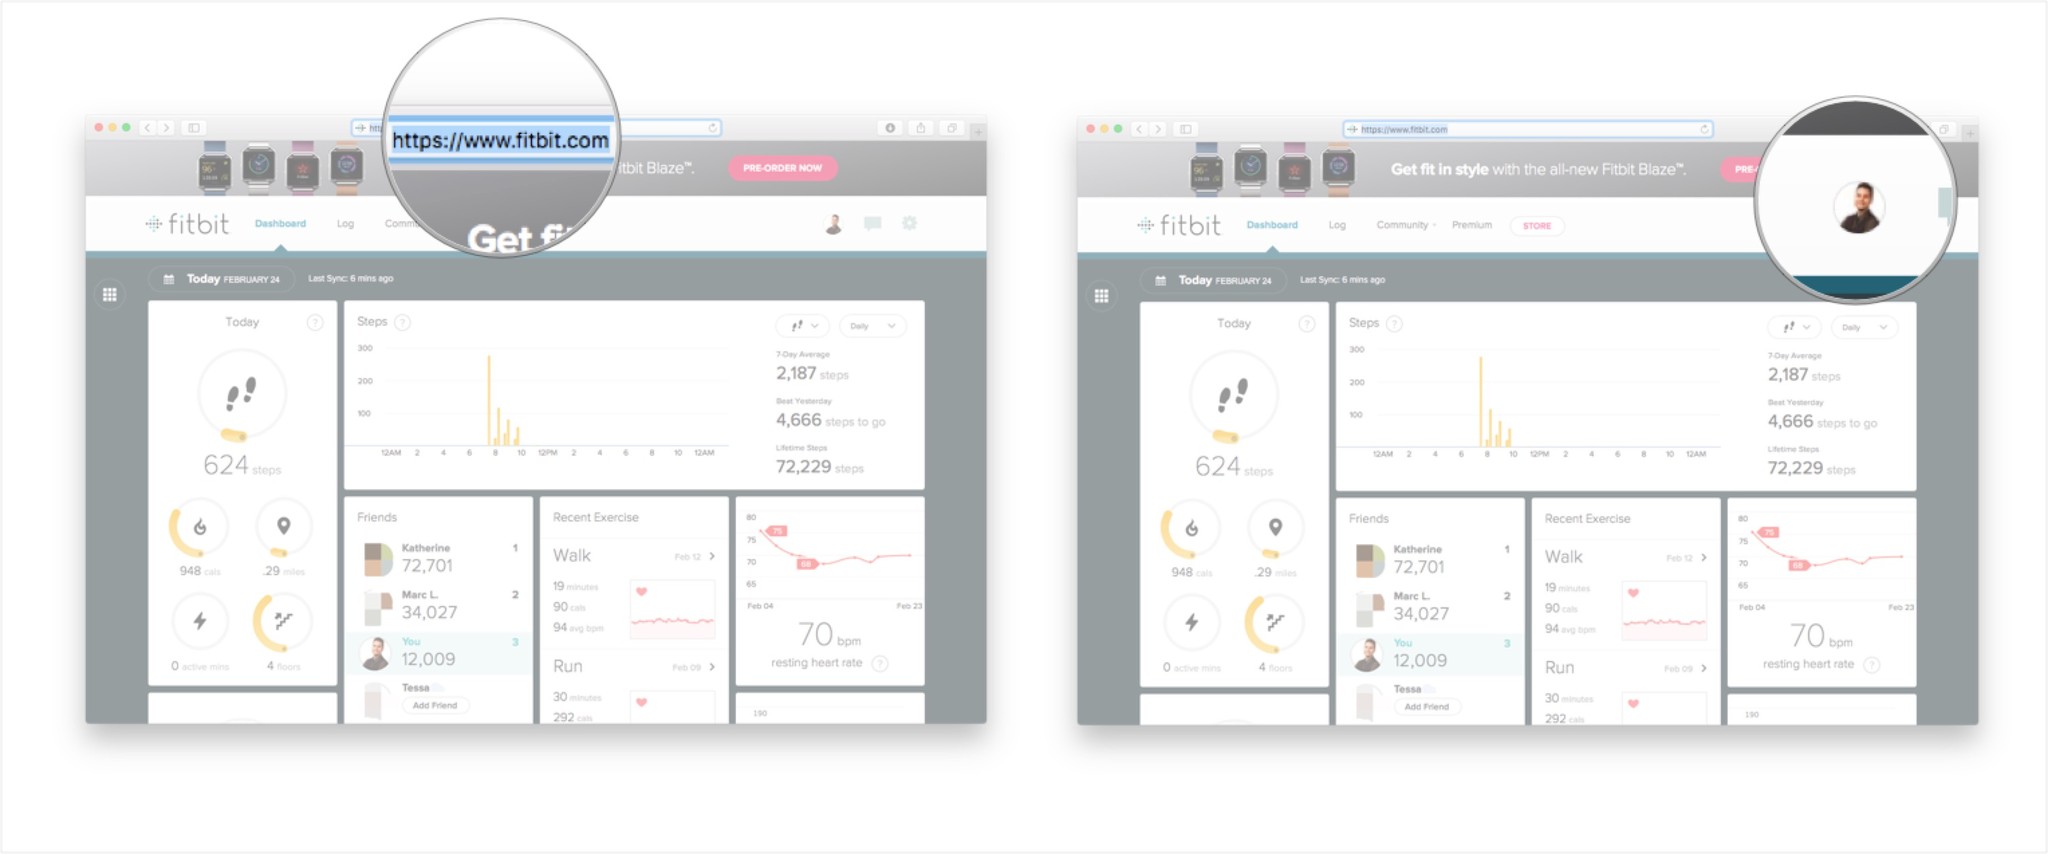
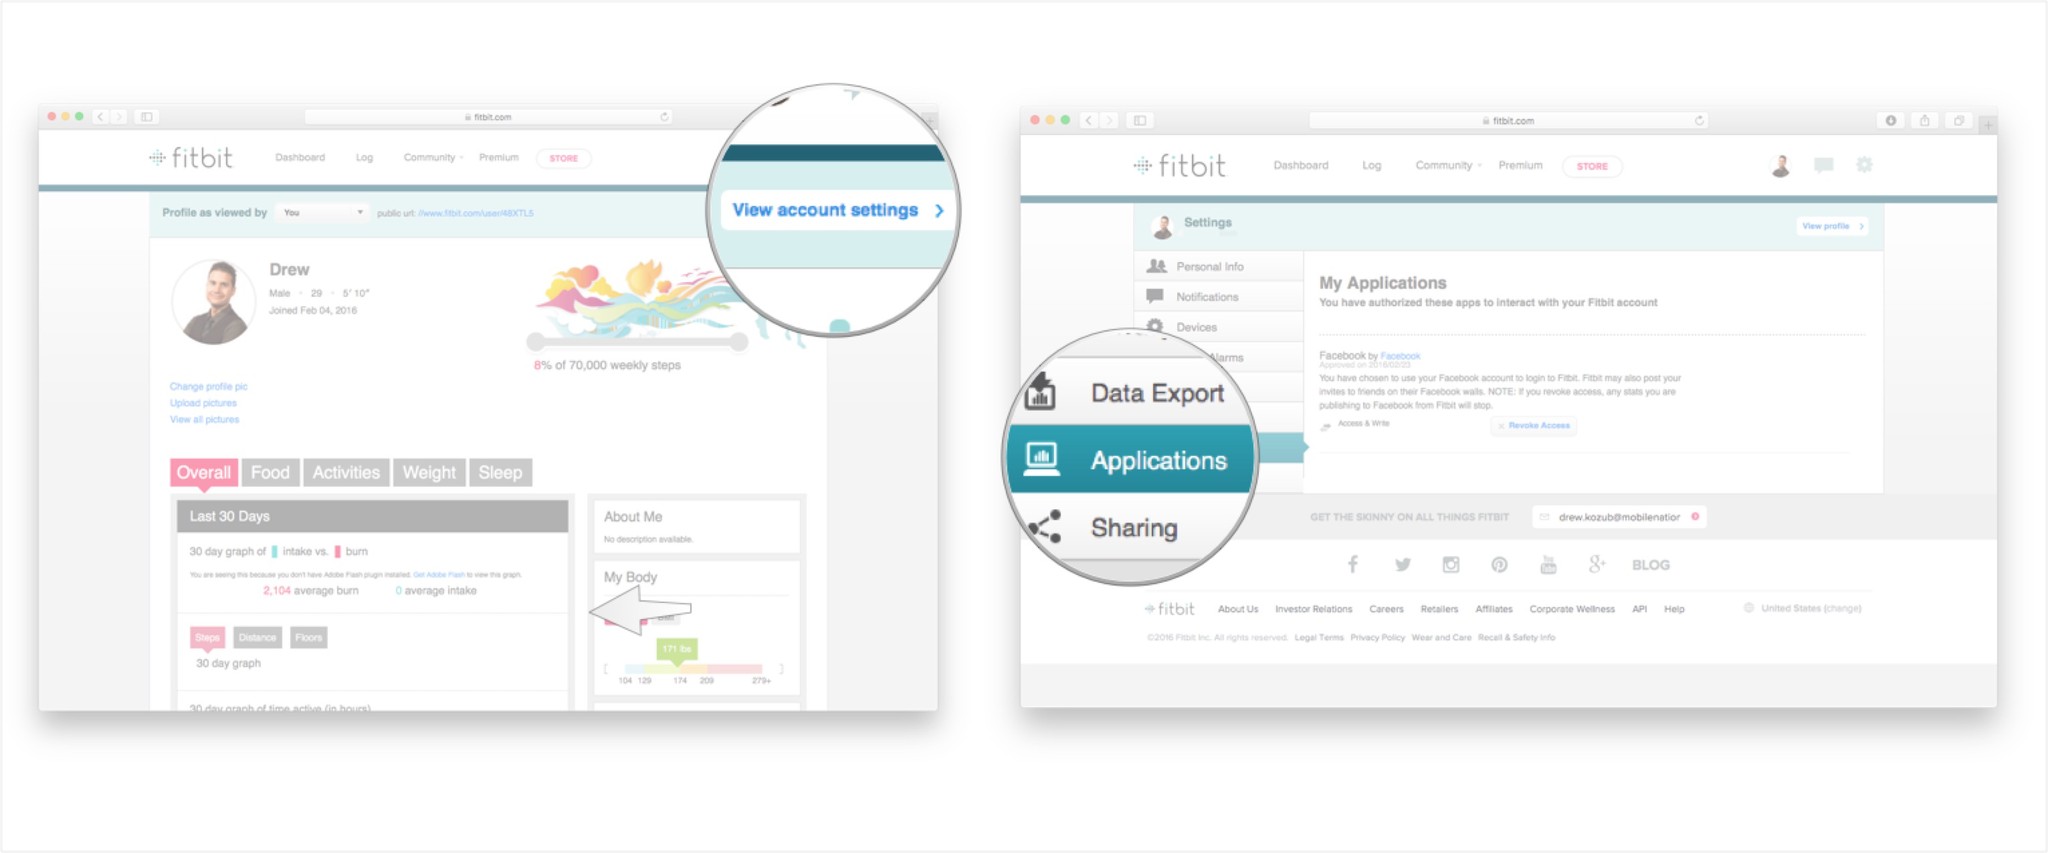
- Click on the view account settings button at the top, right corner of your screen.
-
Click on the Personal Info tab.
- From here there several personal settings you can adjust:


- Scroll to the Profile section to change the email address and password associated with your Fitibit account, add a nickname and bio that will be visible to other Fitbit users, or update your address.
-
Scroll to the Units section to change the measurement units for length, weight, and your water consumption.

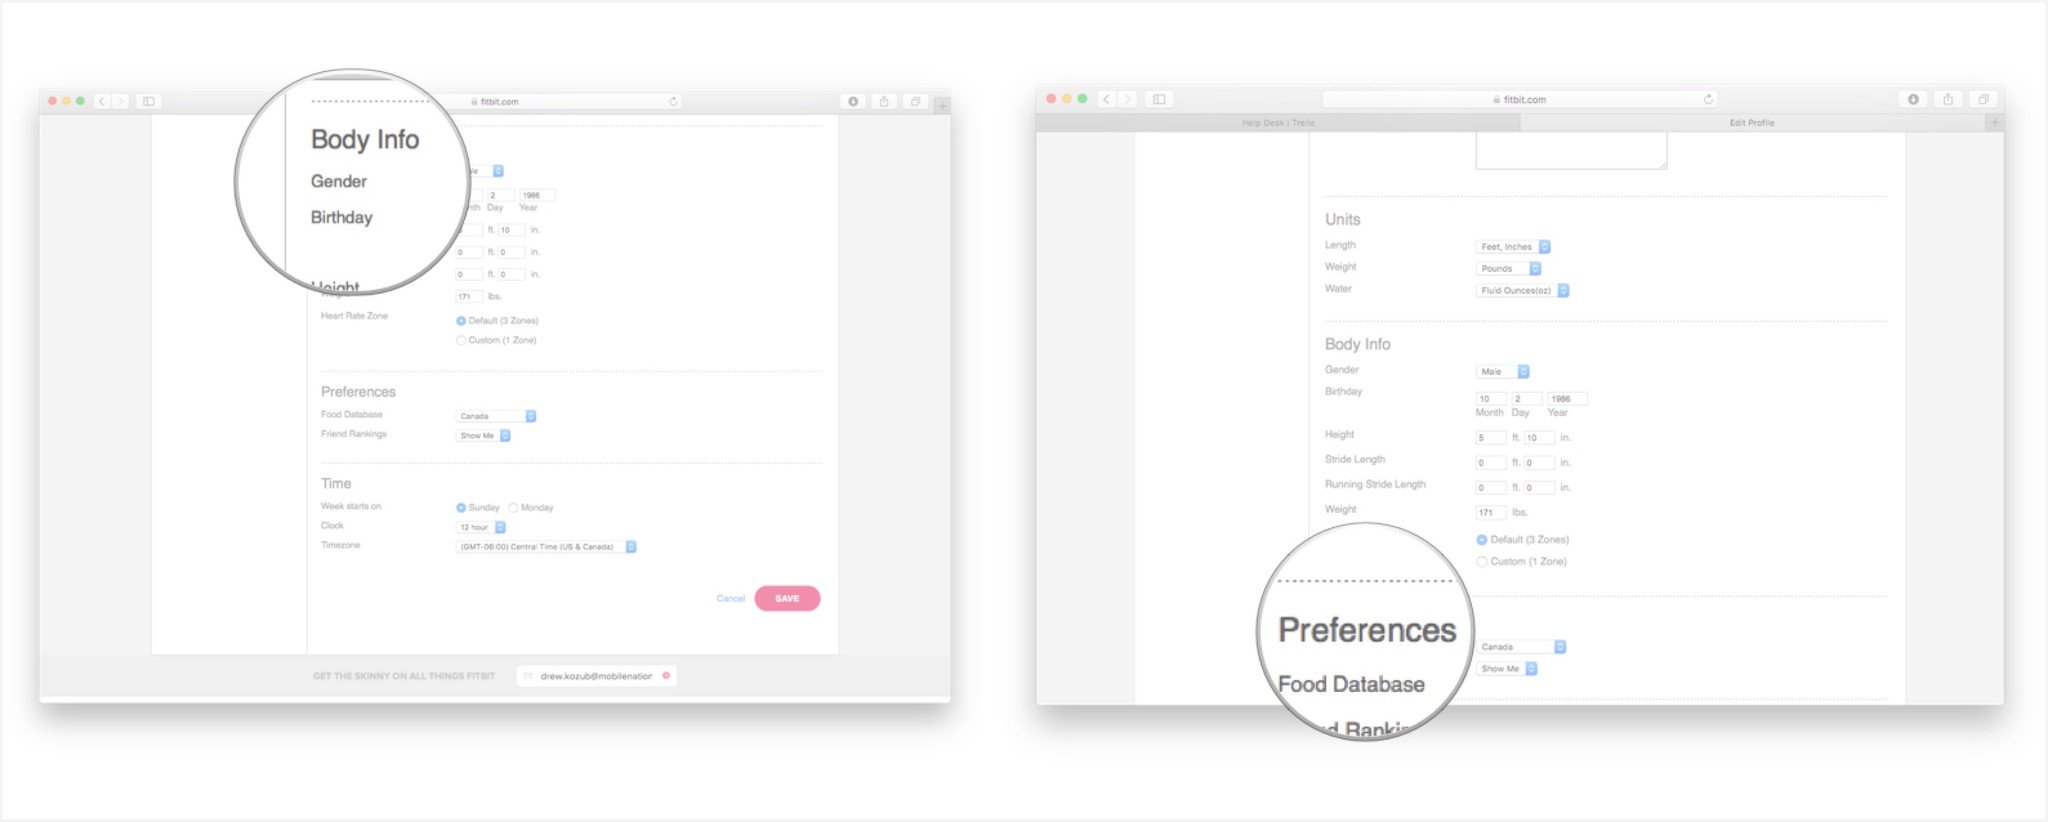
- Scroll to the Body Info section to add in specific information about your age, height, and other physical measurements.
-
Scroll to the Preferences section to select which countries food guide your meals will be logged against and whether or not you want to your friends to see your overall fitness rankings.
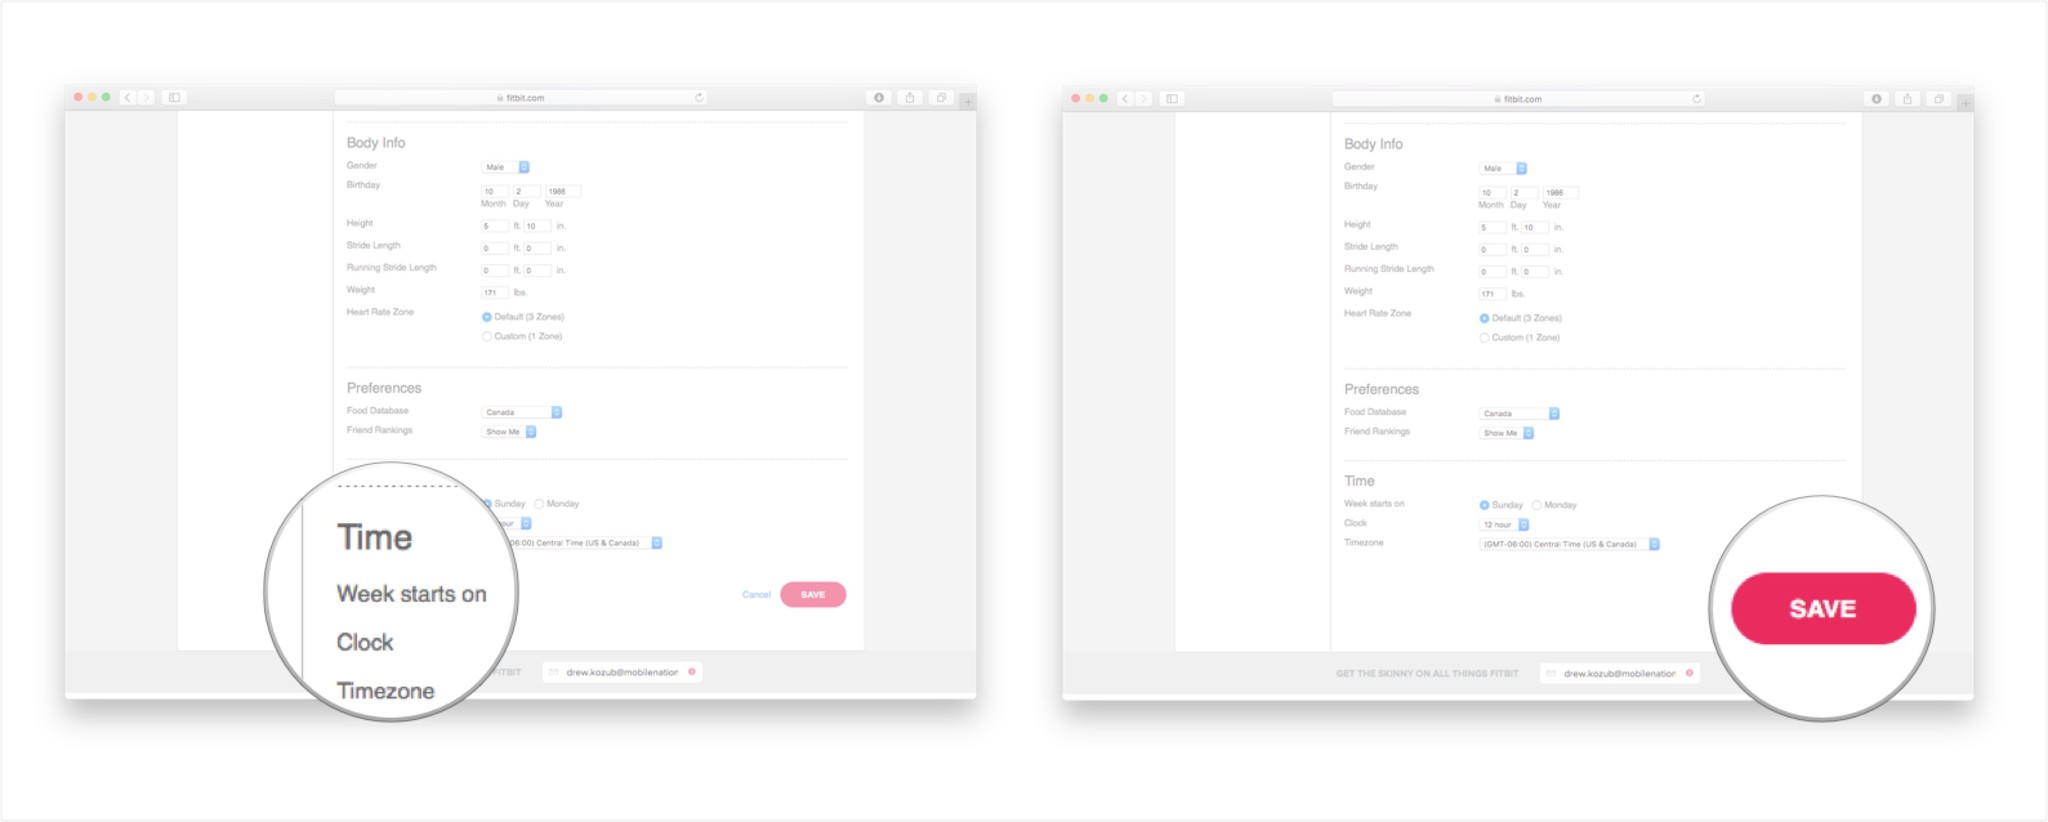
- Scroll to the Time section to set calendar, clock, and timezone preferences.
-
Click the save button after changing any of the settings in this section.
 Depending on your privacy settings, the information you update in this section may be visible to other Fitbit users, so keep that in mind when you're adding in things like your nickname and weight.


 Depending on your privacy settings, the information you update in this section may be visible to other Fitbit users, so keep that in mind when you're adding in things like your nickname and weight.
By customizing these settings you may be able to achieve more accurate or detailed results when tracking your fitness progress.
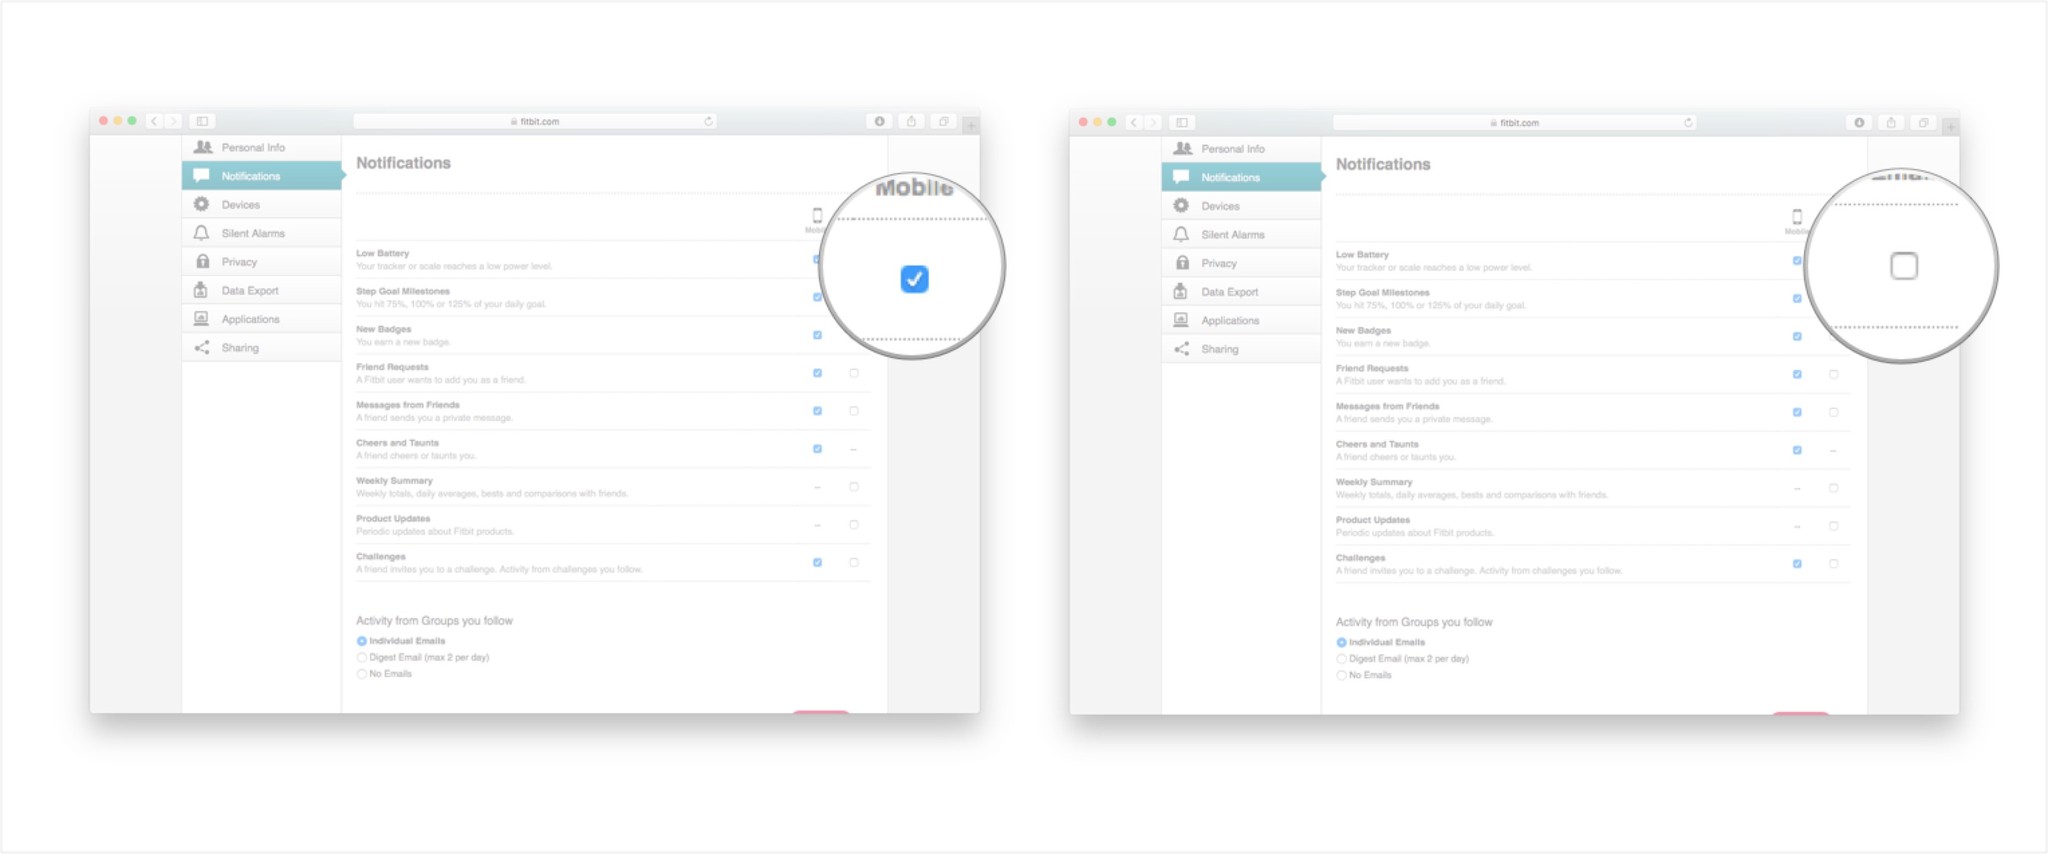
How to manage notifications
Receiving too many emails or alerts on your phone from Fitbit? Control that through the notifications setting on your account.
- Navigate to the online Fitbit dashboard on your Mac.
-
Click on your profile picture on the top right of your screen.

- Click on the view account settings button at the top, right corner of your screen.
-
Click on the Notifications Tab tab.

- From here there several notification settings you can check or uncheck.


- To receive email or mobile notifications for a particular action, check the box next to the setting you would like to be notified about by clicking in the box.
-
To stop receiving email or mobile notifications for a particular action, uncheck the box next to the setting you would like to stop receiving notifications for by clicking on the check mark.
-
Once you've changed these settings, be sure to click on the save button at the bottom of the screen before navigating away from this tab.
 You can control the notifications that appear in your inbox as an email or on your phone in many categories like when a friend sends you a message, when you're invited to a challenge, or your battery is low. By accessing the notifications menu you can easily control when you receive alerts on your phone, or in your email inbox.

 You can control the notifications that appear in your inbox as an email or on your phone in many categories like when a friend sends you a message, when you're invited to a challenge, or your battery is low. By accessing the notifications menu you can easily control when you receive alerts on your phone, or in your email inbox.
How to manage devices
- Navigate to the online Fitbit dashboard on your Mac.
-
Click on your profile picture on the top right of your screen.

- Click on the view account settings button at the top, right corner of your screen.
-
Click on the Devices tab.

- From here you can view a lot of information about the Fitbits synced to your account and make some changes to your device.


- Under your device type (mine's the charge HR) you will see the last time your Fitbit was synced, its battery life, and your Firmware Version.
-
Under Silent Alarms you can view and add alarms on your Fitbit which will vibrate to wake you up

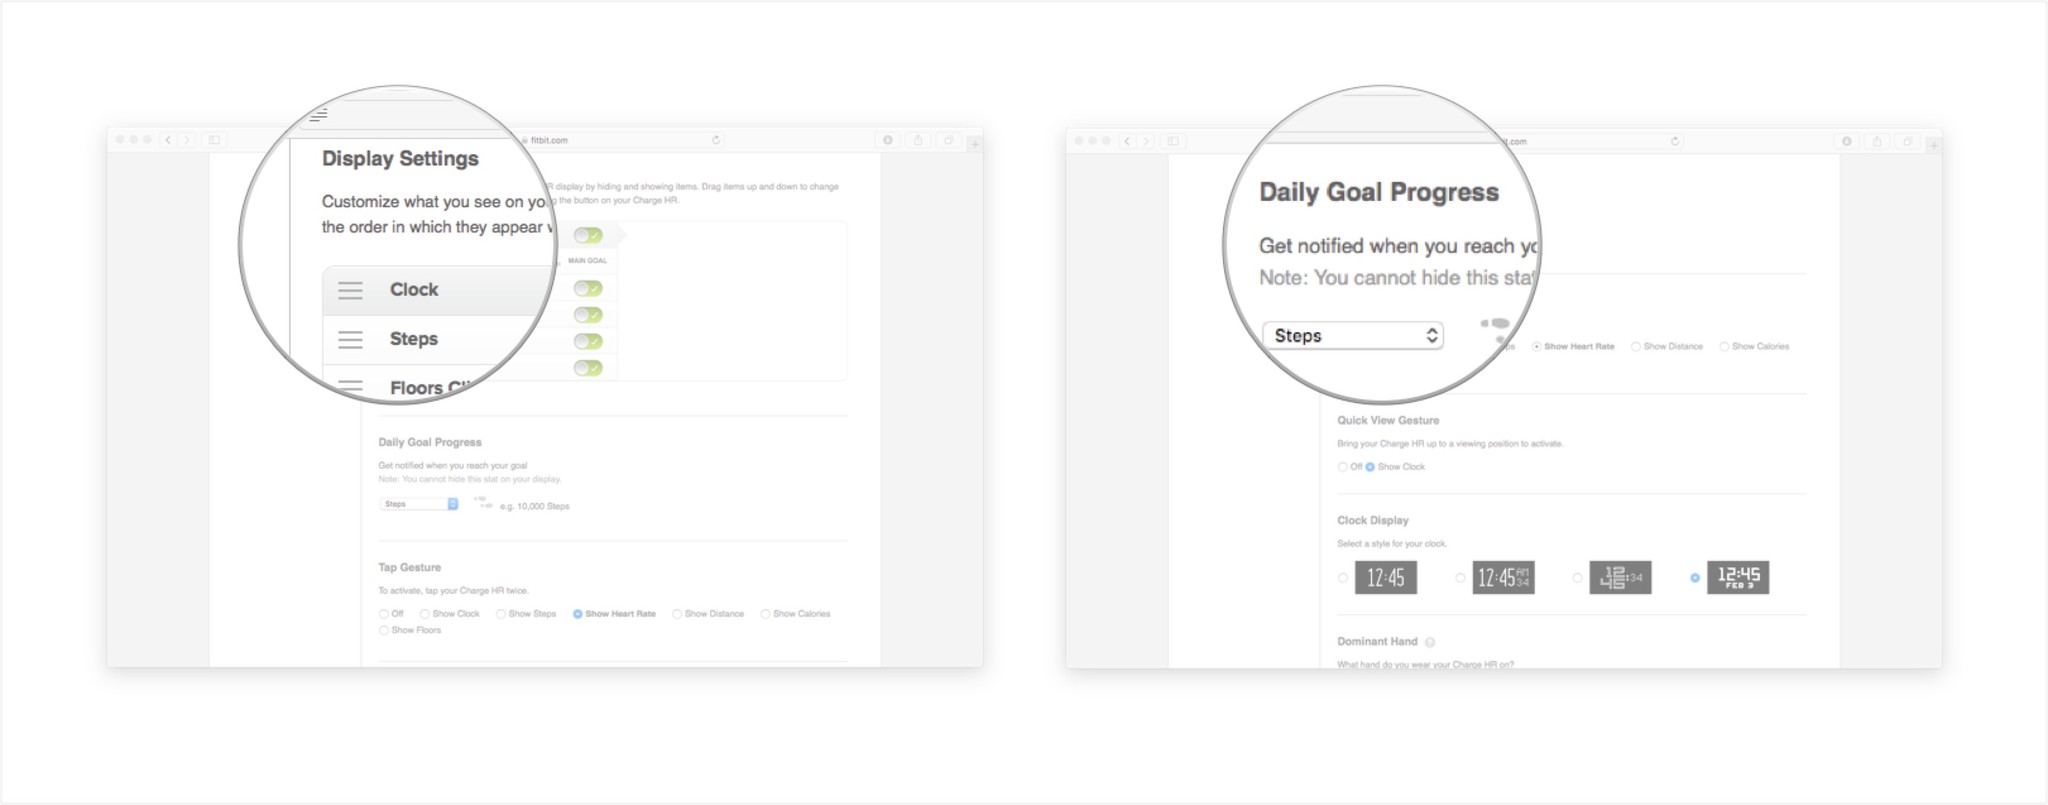
- Under Display Settings you can choose which data is displayed on your the screen of your Fitbit device (if your device has a screen). The options of what you can display will vary depending on your Fitbit model's capabilities
-
Under Daily Goal Progress you can choose what achievement results in a special notification from your Fitbit (e.g. receive a special message and vibration when you hit a particular step count, or calories burned).
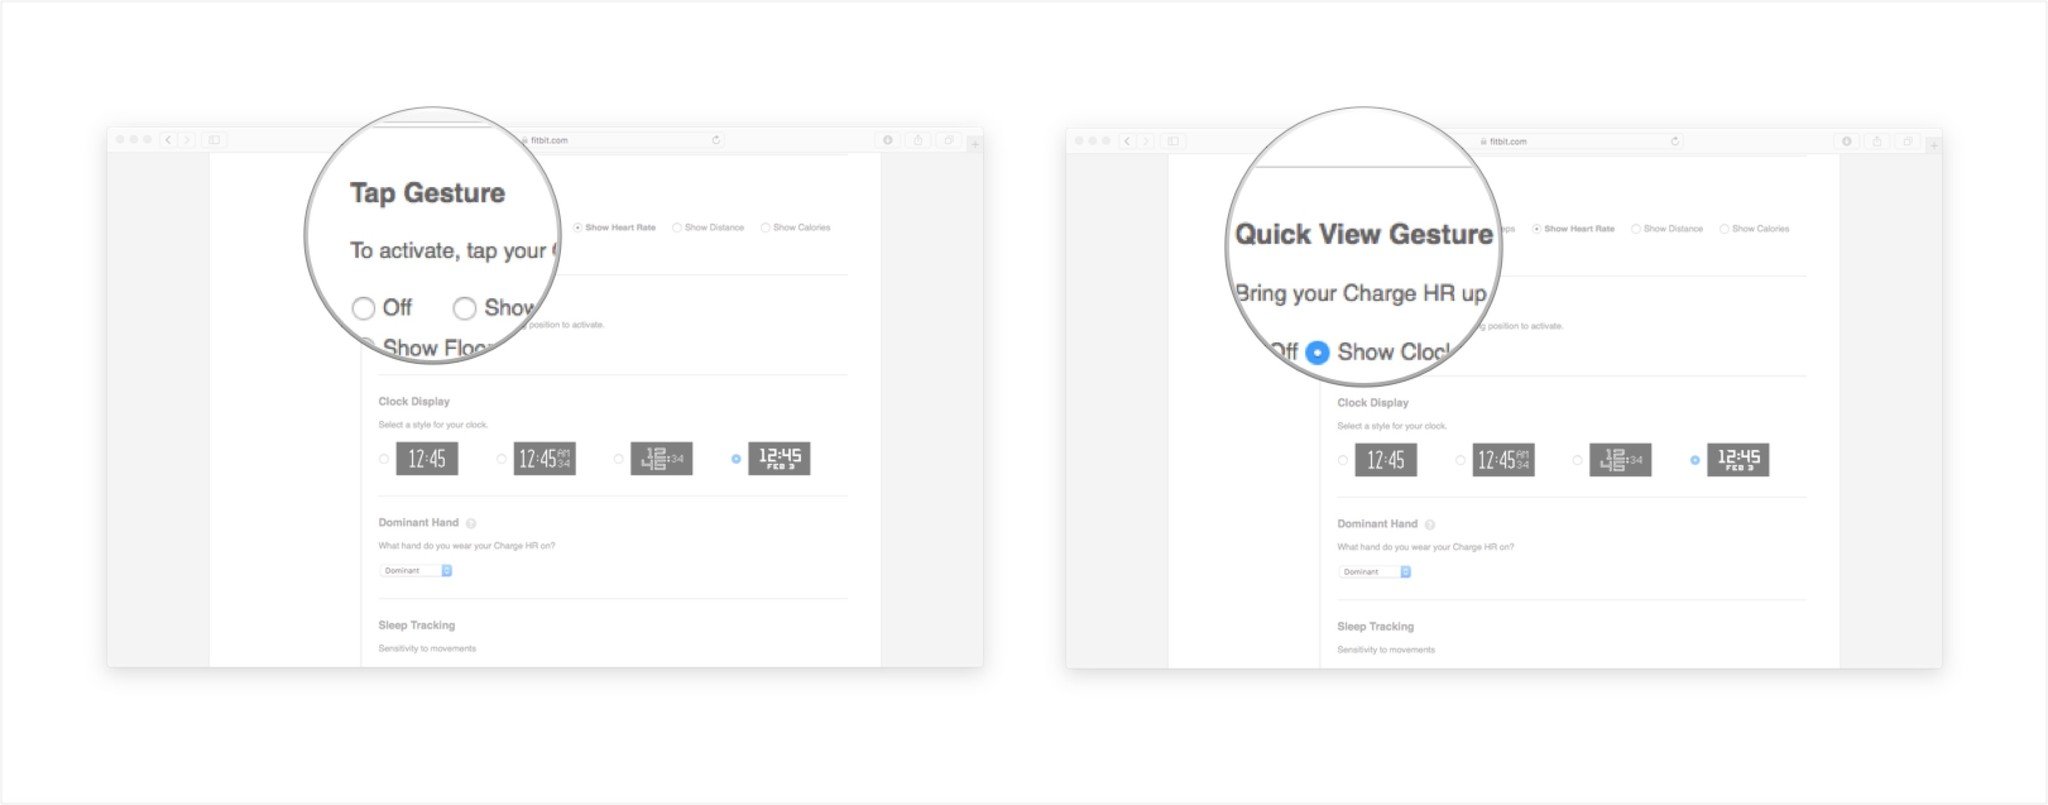
- Under Quick View Gesture you can adjust what happens when you hold your flick your wrist to view the display on your Fitbit (only available on certain models).
-
Under Tap Gesture (only available on certain models with a touch-sensitive strap) you can choose what information is displayed by tapping your Fitbit's band.
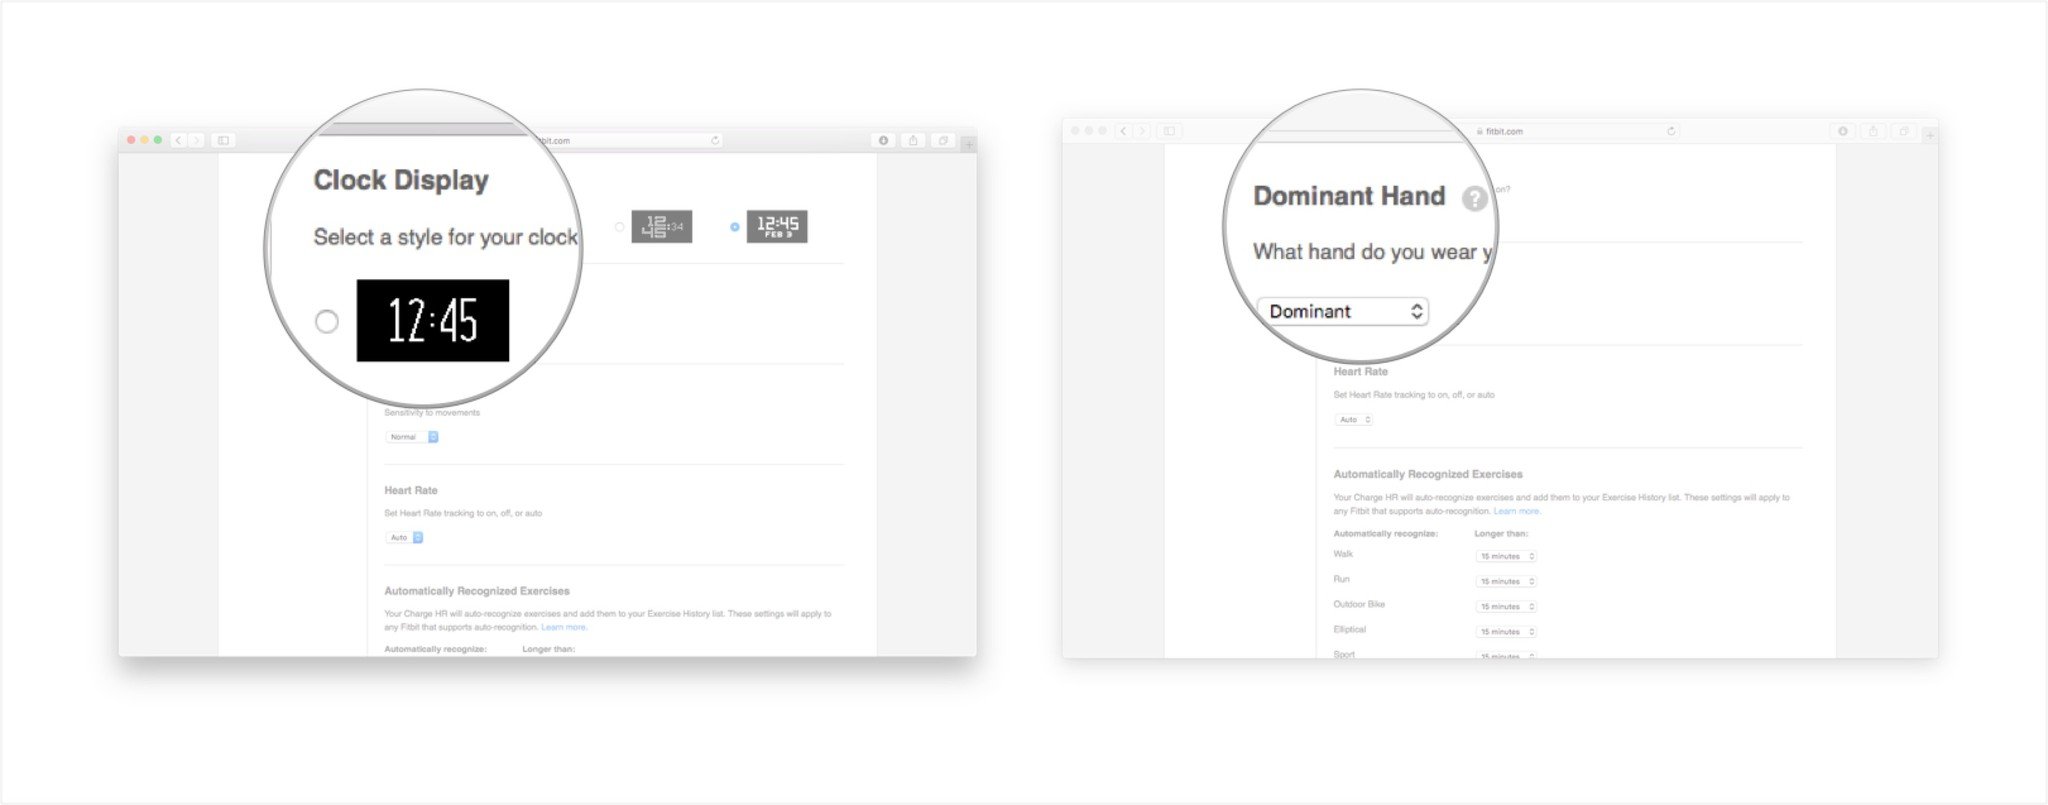
- Under Clock Display you can choose a style for the clock that is displayed on your Fitbit's screen (only available on certain models).
-
Under Dominant Hand you can switch which wrist you most frequently wear your wrist on which will affect the overall accuracy of your activity tracking.
- Under Sleep Tracking you can adjust the overall sensitivity of your Fitbit to movement while you're sleeping.
-
Under Heart Rate you can change how frequently your heart rate is monitored (only available on models with a built-in heart rate monitor).
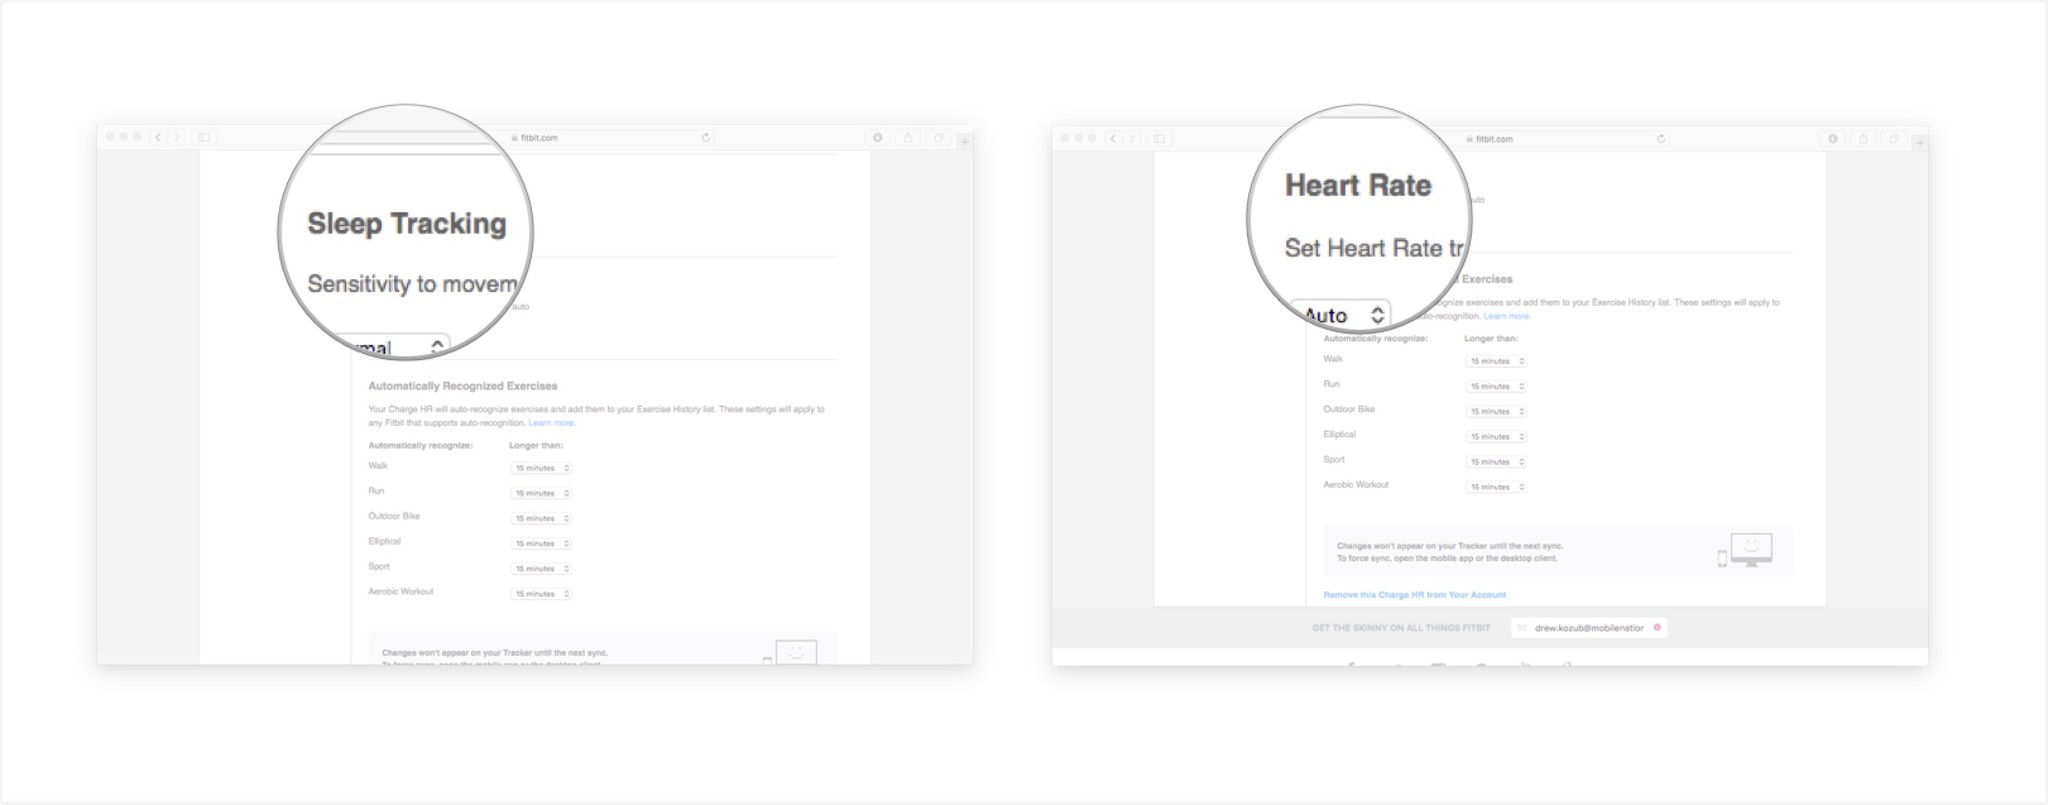
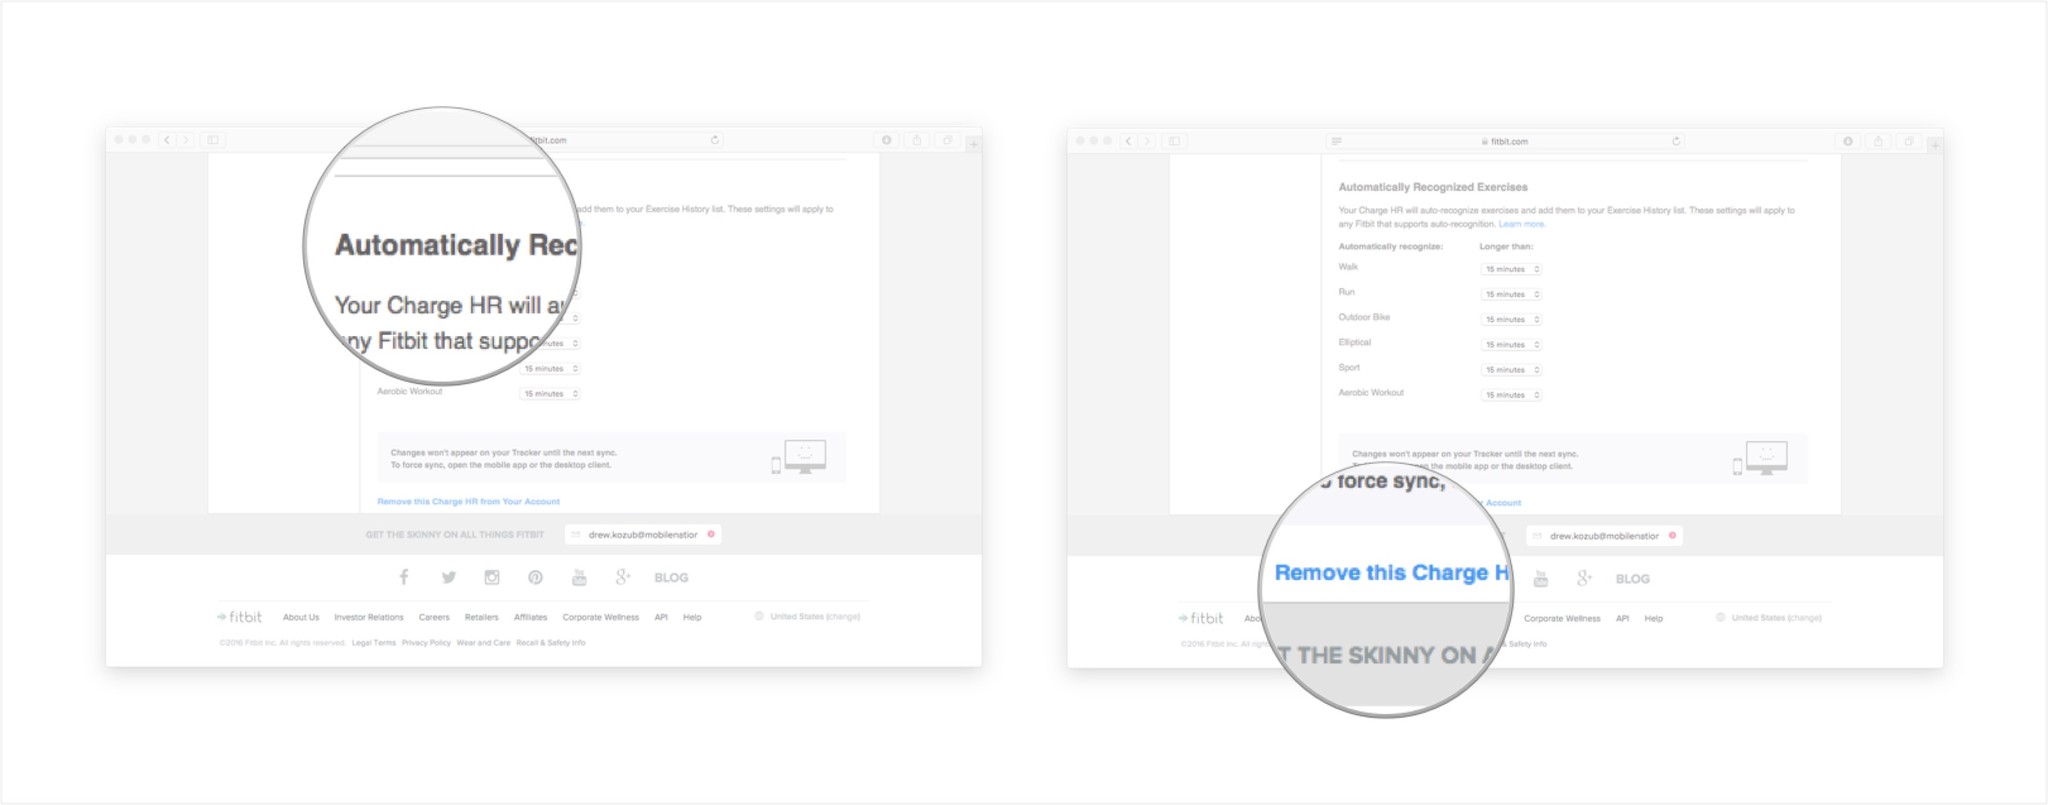
- Under Automatically Recognized Exercises you can adjust how your Fitbit recognizes and tracks your fitness activities in categories like walking, running, sports, and more.
-
At the bottom of the screen under this tab, you can also remove a device from your account by clicking Remove this [YOUR DEVICE] from Your Account
 There are a lot of settings you can manage from this section of your profile, so if you're ever wondering, "How do I do this on my Fitbit?" The answer is probably buried in Devices tab in your account settings.


 There are a lot of settings you can manage from this section of your profile, so if you're ever wondering, "How do I do this on my Fitbit?" The answer is probably buried in Devices tab in your account settings.
How to change Privacy Settings
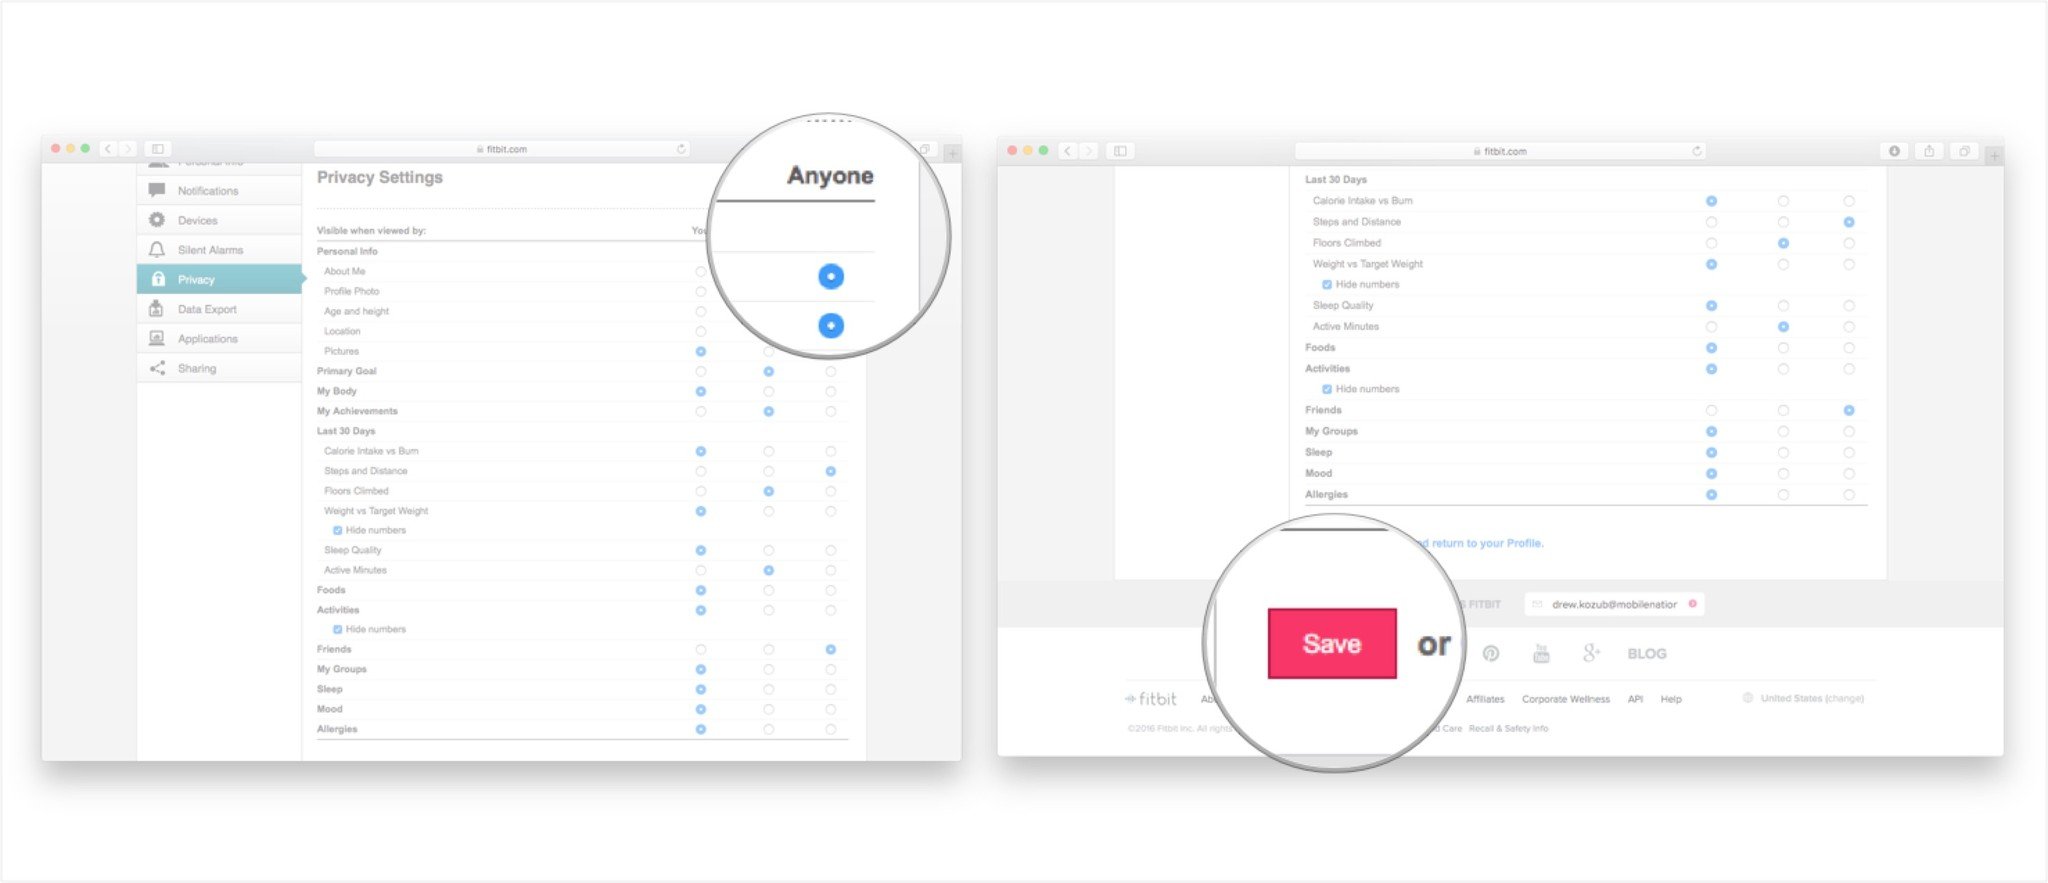
Once you create your Fitbit account and start using your device, a lot of information is tracked. Decide which information is visible to other Fitbit users by adjusting your Privacy Settings.
- Navigate to the online Fitbit dashboard on your Mac.
-
Click on your profile picture on the top right of your screen.

- Click on the view account settings button at the top, right corner of your screen.
-
Click on the Privacy tab.
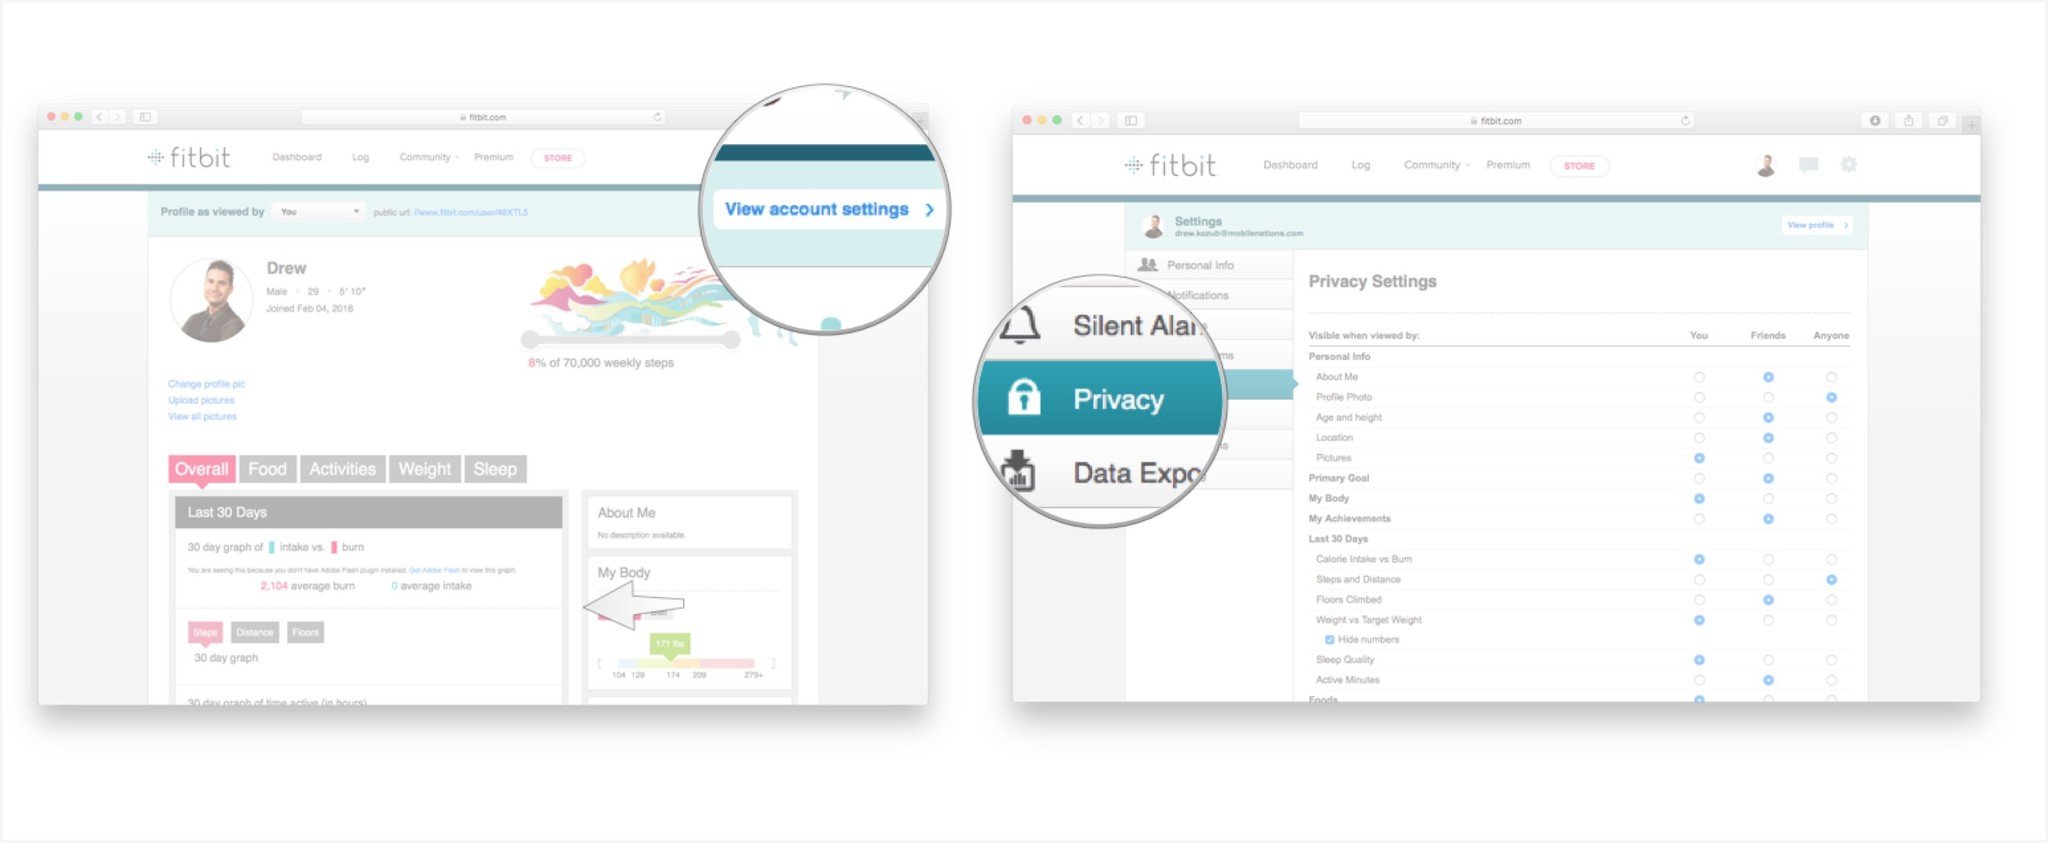
- From here you can adjust which information is visible to only you, to you and your friends, or is visible to anyone and everyone using a Fitbit.


- Click in one of the circles in the You column to make information for that particular category (example Profile photo) visible to only you.
-
Click in one of the circles in the Friends column to make information for a particular category visible to the people on your Fitbit friends list.
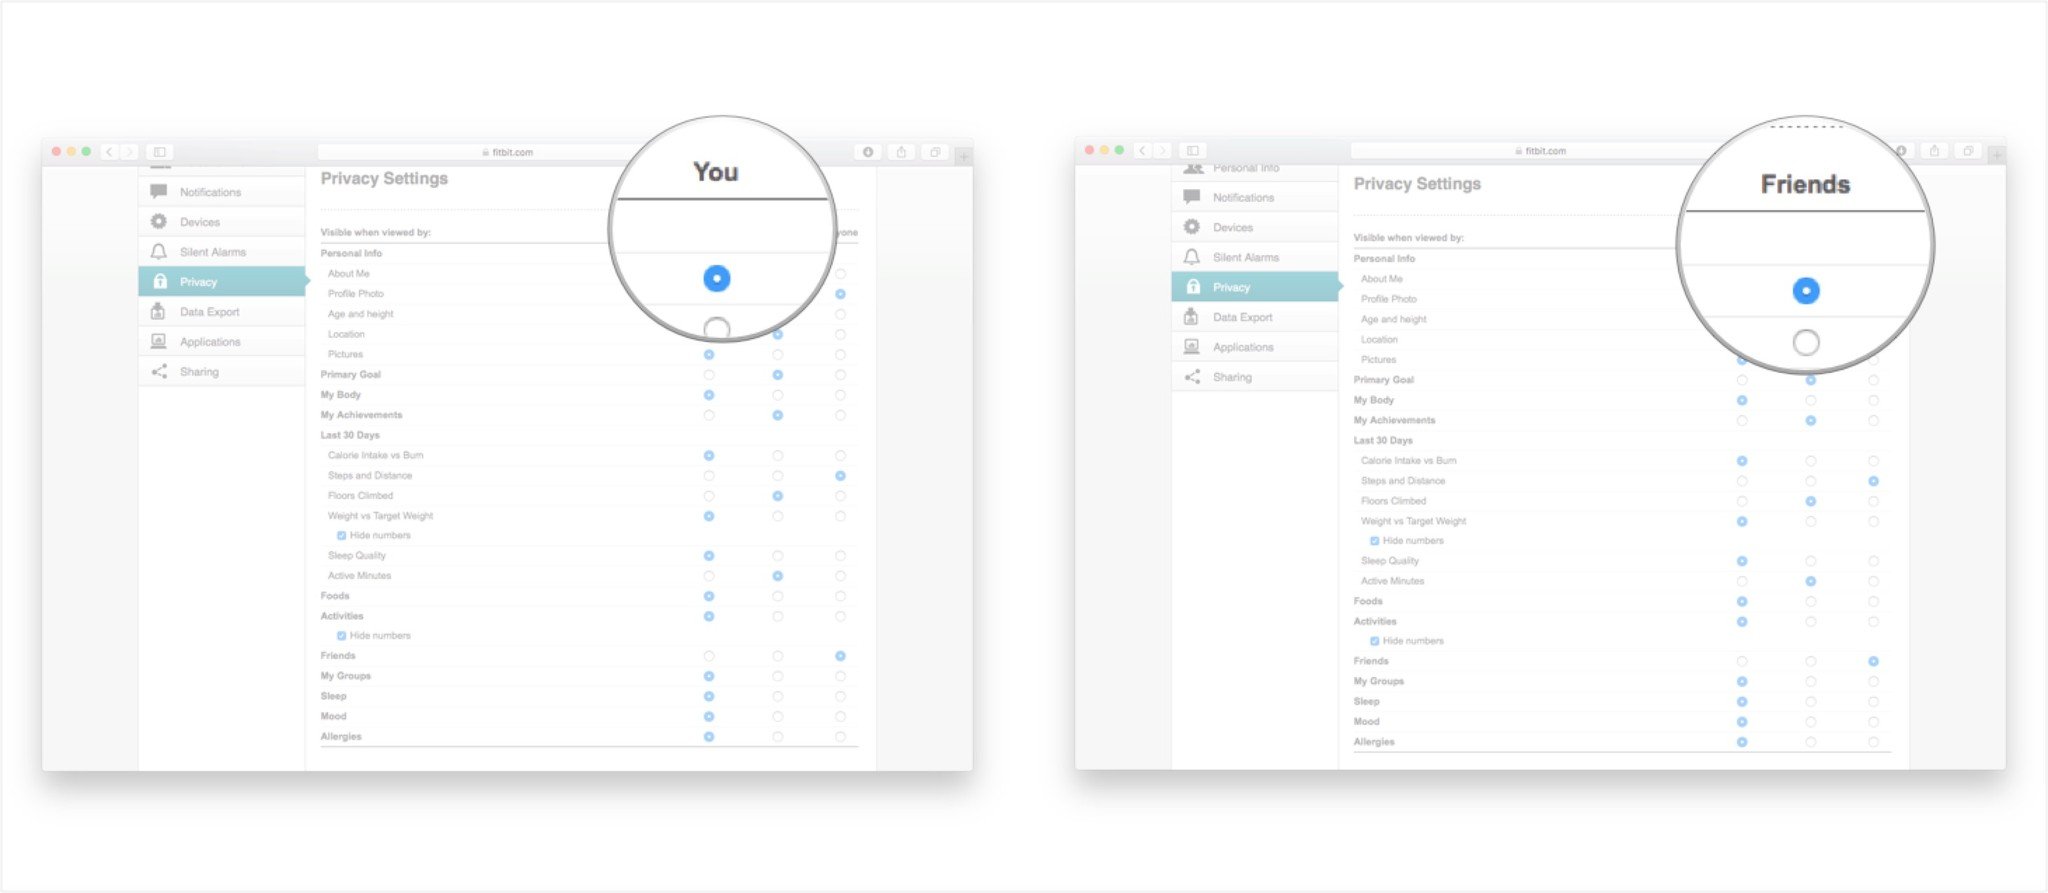
- Click in one of the circles in the Anyone category to make information for a particular category only visible to you.
-
When you're done adjusting these settings, be sure to click the save button at the bottom of the screen.


How to export data
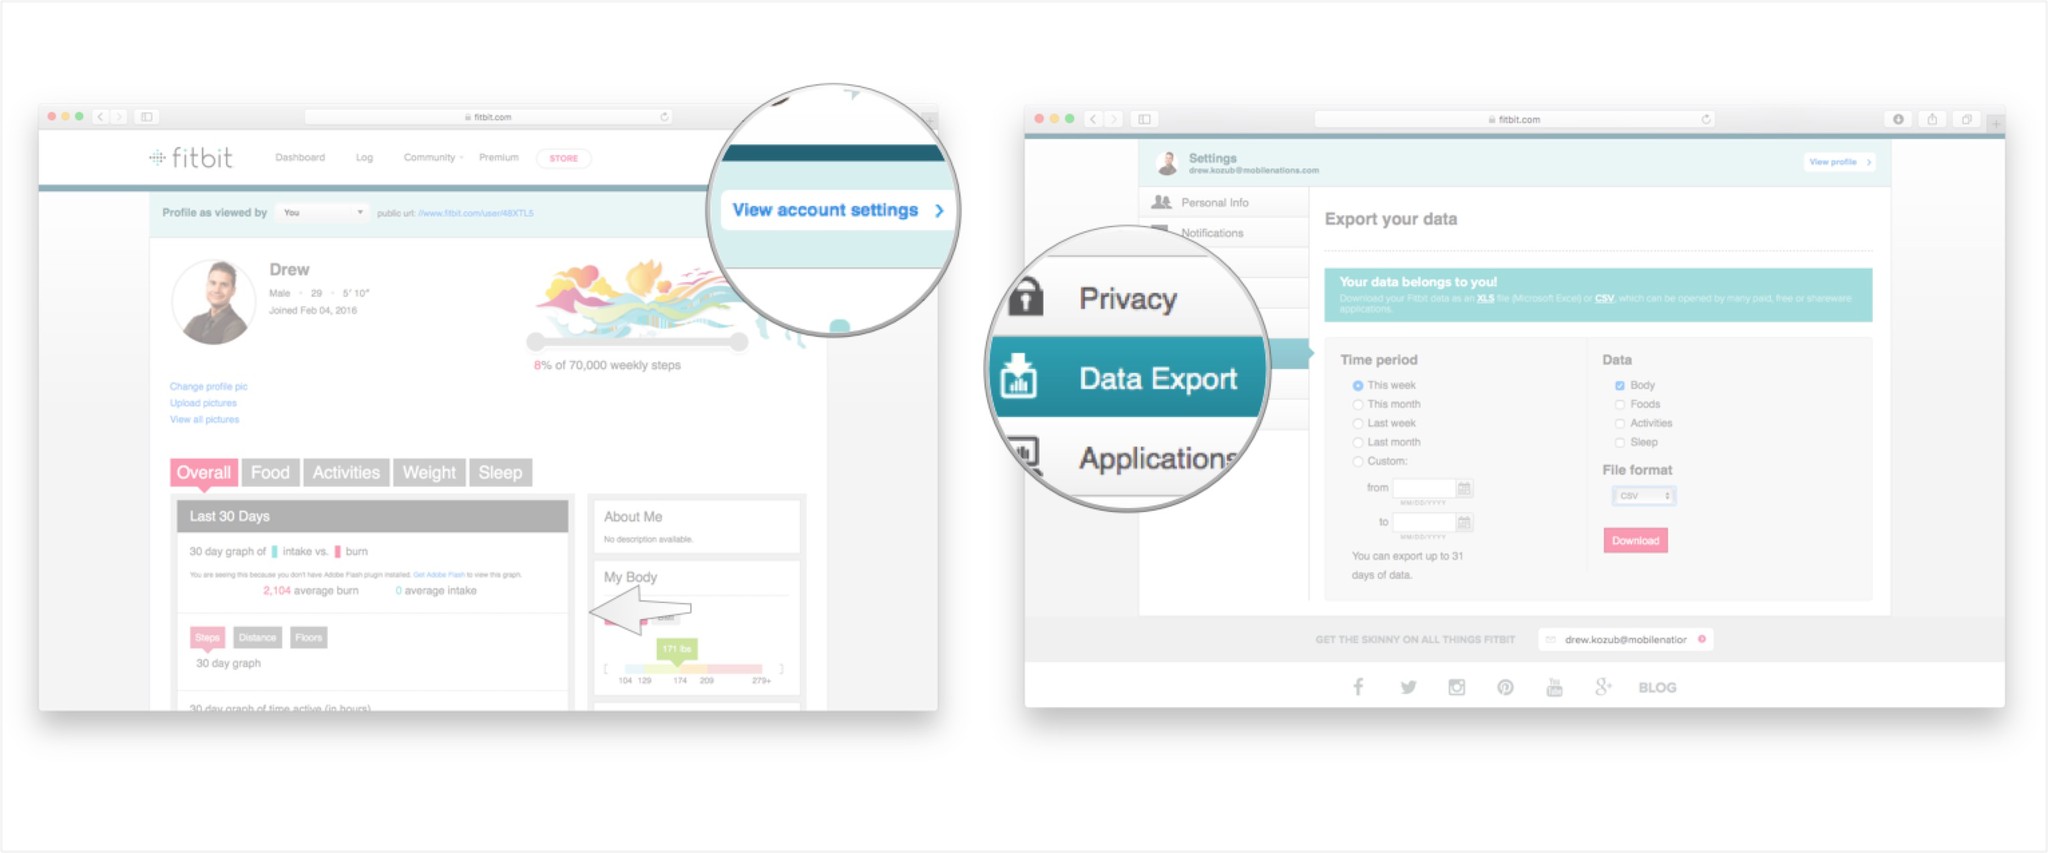
Fitbit does a great job of tracking the history of your workouts in the Fitbit dashboard. If you want to export this information to print it off or email to someone, you can do this through the Data Export tab.
- Navigate to the online Fitbit dashboard on your Mac.
-
Click on your profile picture on the top right of your screen.

- Click on the view account settings button at the top, right corner of your screen.
-
Click on the Data Export tab.
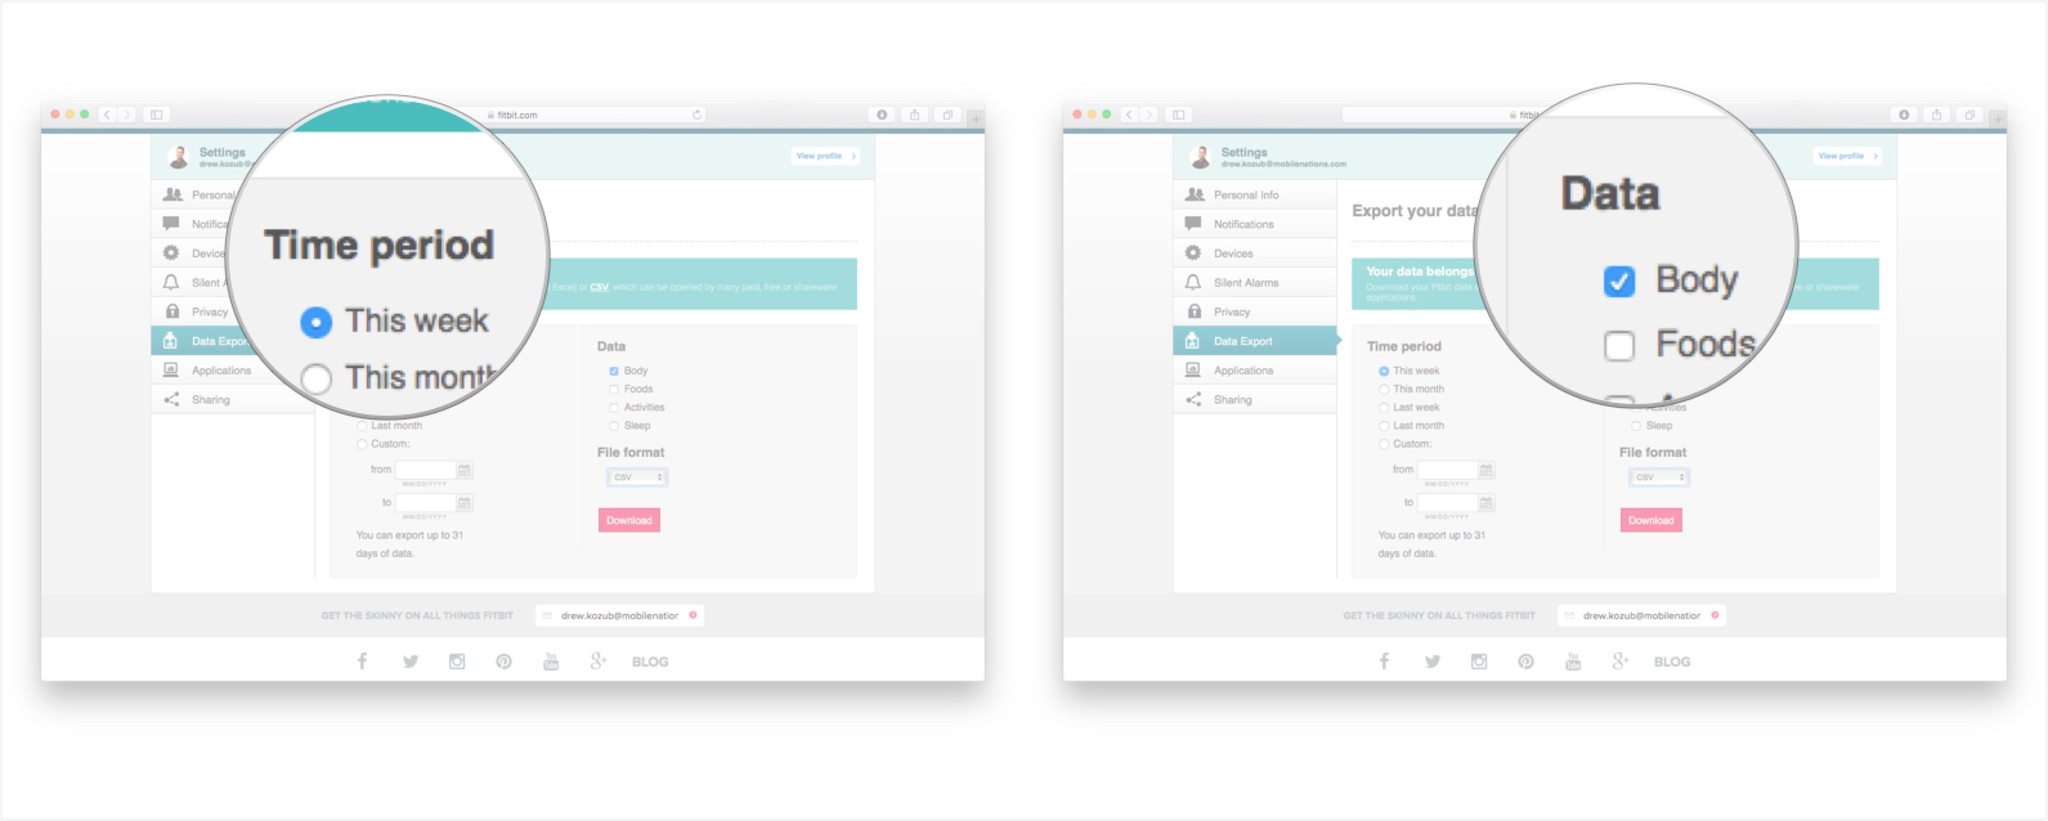
- Under the Time Period heading, specify the dates you would like to export the data from by clicking in the appropriate circle (note, you can only export up to 31 days of data at a time).
-
Under the Data heading, choose which activity categories you would like to export data from by clicking in the appropriate box(es).
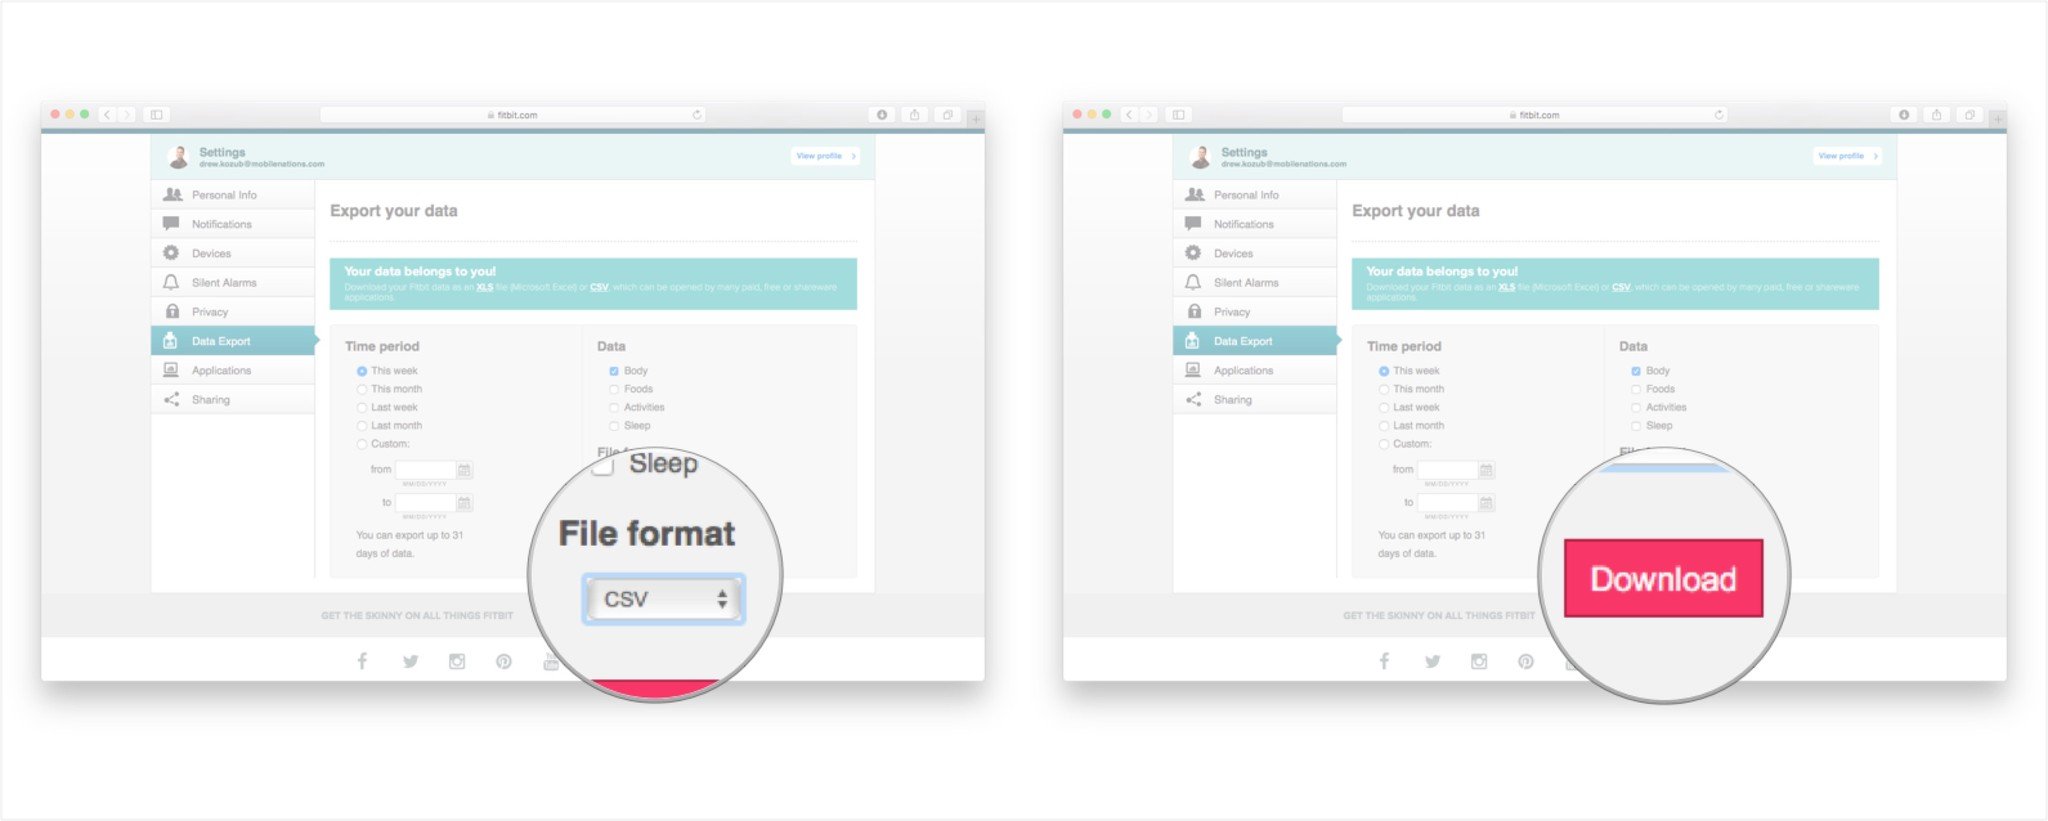
- Under File Format chose which file type you would like to export your data as (XLS files can be opened in Excel while selecting CSV creates a spreadsheet that can be opened by several Excel-like, free programs).
-
Click on the Download button to export your fitness information.


How to manage synced applications
Did you know you can sync your social media, food loggers, and more apps to work with your Fitbit? Once you've got these synced, if you don't like the way they work with your Fitbit you can choose to remove these apps from your account.
- Navigate to the online Fitbit dashboard on your Mac.
-
Click on your profile picture on the top right of your screen.
- Click on the view account settings button at the top, right corner of your screen.
-
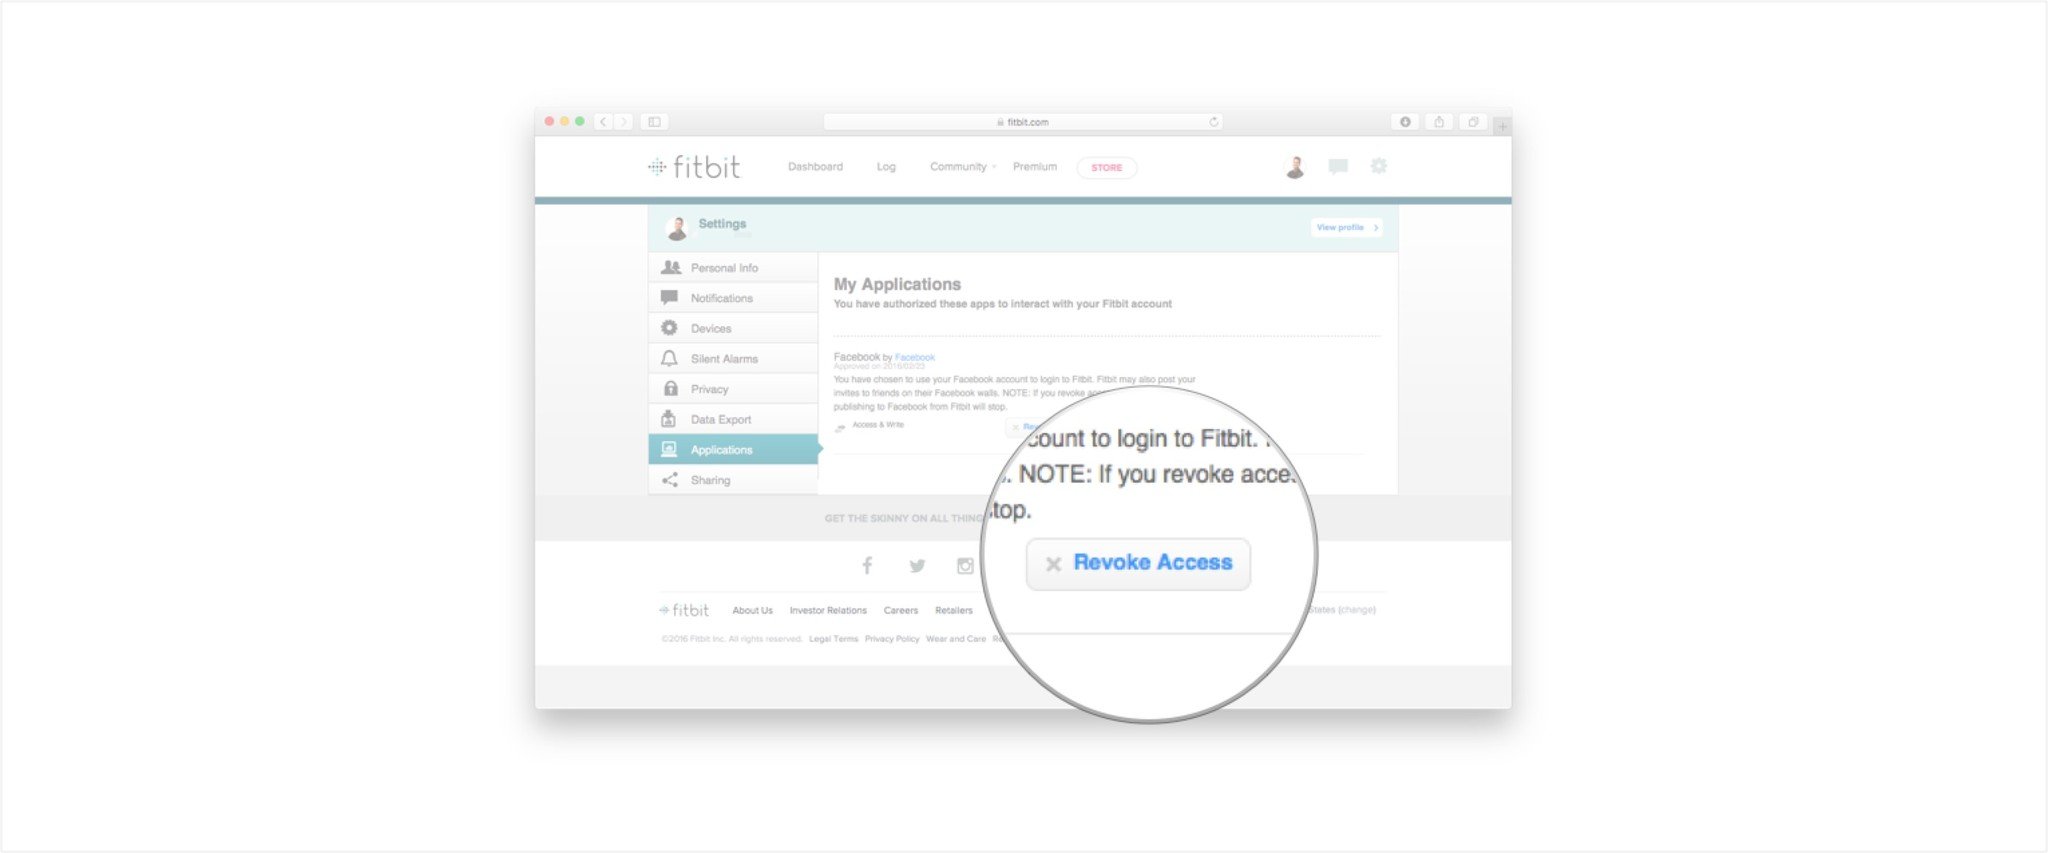
Click on the Applications tab.
-
On this page you'll see a list of the third-party applications you have associated with your Fitbit account (example Facebook). Click on the Revoke Access button to stop a program from syncing with your Fitbit account.


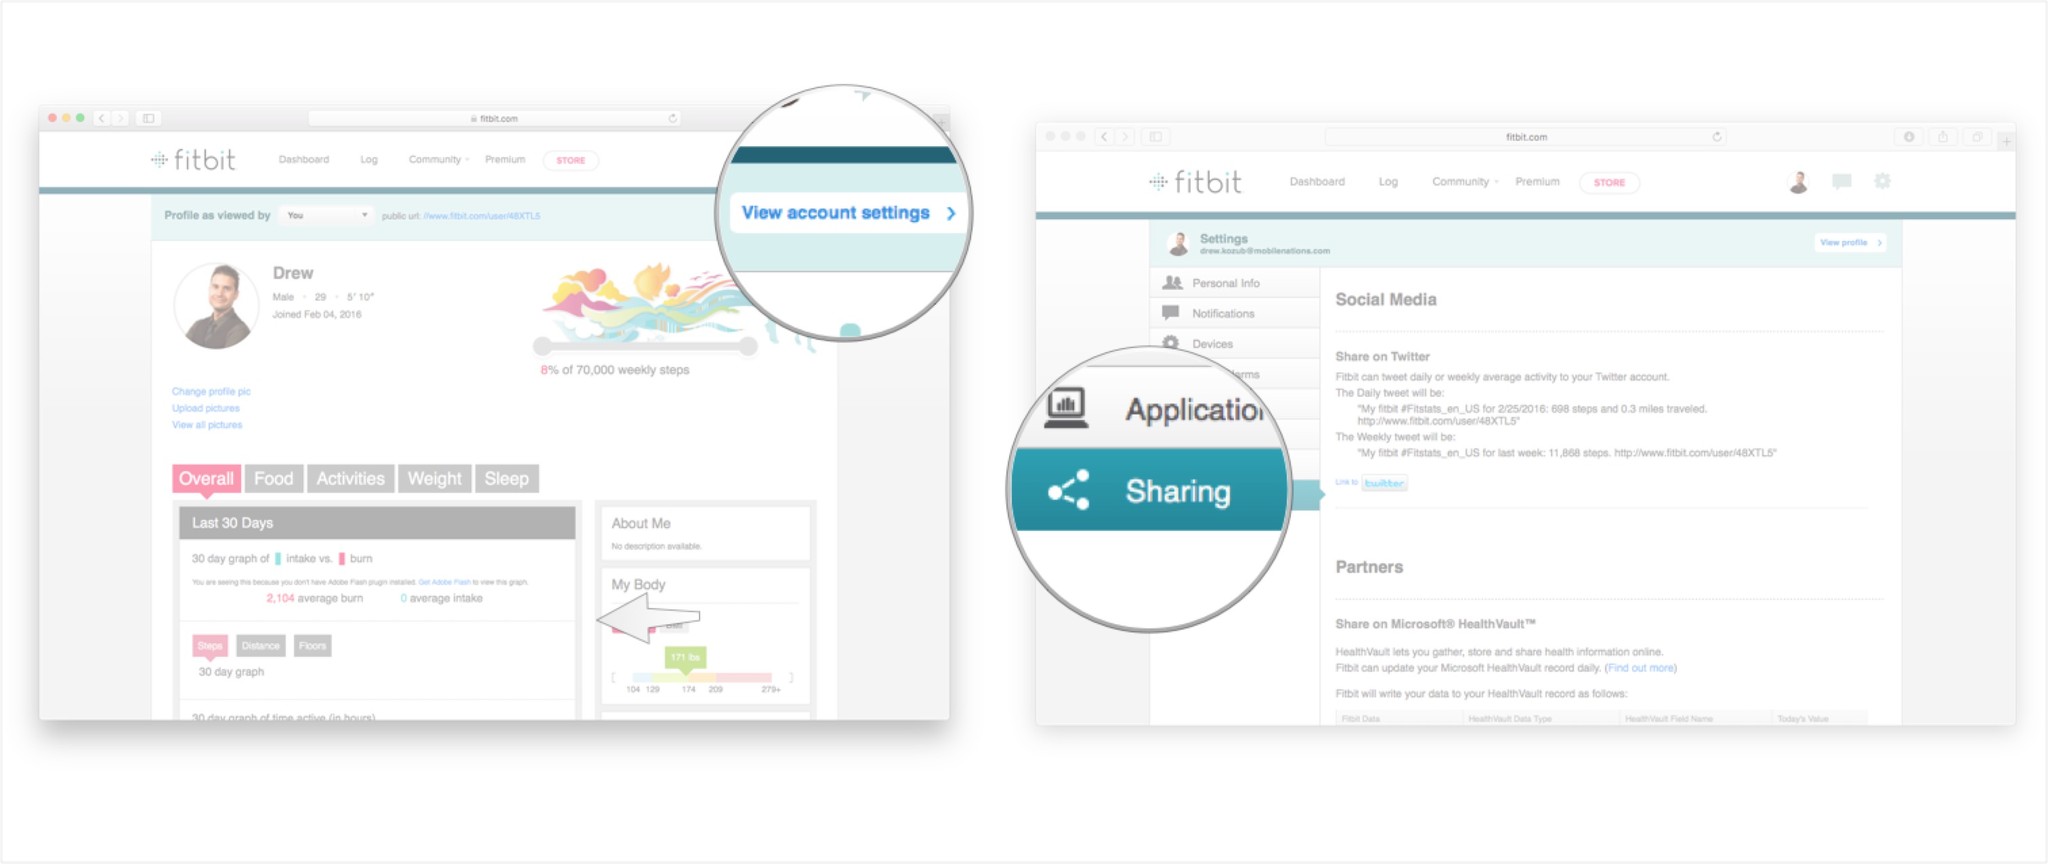
How to manage sharing settings
- Navigate to the online Fitbit dashboard on your Mac.
-
Click on your profile picture on the top right of your screen.
- Click on the view account settings button at the top, right corner of your screen.
-
Click on the Sharing tab.
-
From here, you can link your account with various social media and partner sites.
- Click on the twitter button to have the option to share your daily or weekly Fitbit activity.
- Click on the Link to your HealthVault record button to link your Fitbit with your Microsoft HealthVault account.
 Your Fitbit tracks a lot of data for you related to your fitness activities and exercise history. By knowing what functions are available, you'll have a better idea of how to customize your Fitbit for your needs. Many of these customizations can be managed by logging into your Fitbit account on your computer. Start exploring your own Fitbit and customize your account settings to work exactly the way you want them to!


 Your Fitbit tracks a lot of data for you related to your fitness activities and exercise history. By knowing what functions are available, you'll have a better idea of how to customize your Fitbit for your needs. Many of these customizations can be managed by logging into your Fitbit account on your computer. Start exploring your own Fitbit and customize your account settings to work exactly the way you want them to!
We may earn a commission for purchases using our links. Learn more.
How to Add a New Fitbit to Your Account
Source: https://www.imore.com/how-mange-your-fitbit-account-mac